Credit transfers
Create and track individual credit transfers, monitor payment status through approval workflows, and access comprehensive payment details with timeline tracking
Introduction
The Credit Transfers feature provides comprehensive tools for managing all outgoing payment instructions, enabling users to track credit transfers from creation through execution. This interface consolidates payment information, status updates, and approval workflows into an accessible view where users can monitor individual transactions, review payment details, and manage authorizations efficiently.
The system presents payment data through two primary interfaces: a list view showing all credit transfers with customizable columns and filters, and a detailed view displaying complete payment information including timeline tracking, additional details, attached documents, and audit history.
Credit transfers list view
Prerequisites
Users must have the appropriate permissions to view and manage credit transfers. The interface displays only transactions for ordering party accounts and payment categories to which you have access rights.
Permissions
| Permission | Description |
|---|---|
PAYMENT_READ | View credit transfers, payment details, and status information |
PAYMENT_CREATE | Create new credit transfers and save drafts; manage payment groups |
PAYMENT_APPROVE | Submit draft payments for authorization |
PAYMENT_AUTHORISE | Sign or reject payments (signatory right) |
PAYMENT_CANCEL | Cancel payments before bank submission |
PAYMENT_CANCEL_DRAFT | Cancel payments in draft status only |
PAYMENT_SEND_TO_BANK | Manually send authorized payments to the bank |
PAYMENT_DOCUMENT_ATTACH | Attach, edit, or delete documents on payments |
PAYMENT_SEND_REMINDER | Send reminder notifications to signatories |
PAYMENT_MANUAL_CHANGE_STATUS | Manually change payment status between executed and rejected states |
Account and category scopingUsers see only credit transfers associated with ordering party accounts and payment categories they have been granted access to through their permission configuration. Transaction visibility respects both account-level and category-level scoping.
Credit transfers overview
The Credit Transfers section enables users to navigate through all initiated outgoing payments, providing visibility into transaction details, counterparty information, amounts, and current processing status. This comprehensive view supports efficient payment activity monitoring and management.
Transaction lifecycle
Credit transfers progress through multiple states from creation to final execution:
- Creation - Payment initiated as draft or sent for authorization
- Authorization - Collection of required signatures according to signatory rules
- Bank delivery - Immediate transmission of authorized payment to the bank; weekend and holiday execution dates are automatically adjusted to the next banking day
- Execution - Payment processing and settlement by the bank
Each stage provides specific information and actions relevant to the payment's current state, enabling users to understand precisely where each transaction stands in its processing lifecycle.
Creating credit transfers
LYNKS provides multiple methods for initiating credit transfers, enabling users to create single payments, upload bulk payment files, or configure recurring payments through standing orders.
Initiating new payments
To begin creating a payment:
- Locate the floating action button (+) in the bottom right corner of the screen
- Click the (+) button to open the payment creation menu
- Select from the available options:
- Upload file for multiple credit transfers - Bulk payment file upload
- Credit Transfer - Create single individual payment
- Standing Order - Configure recurring payment
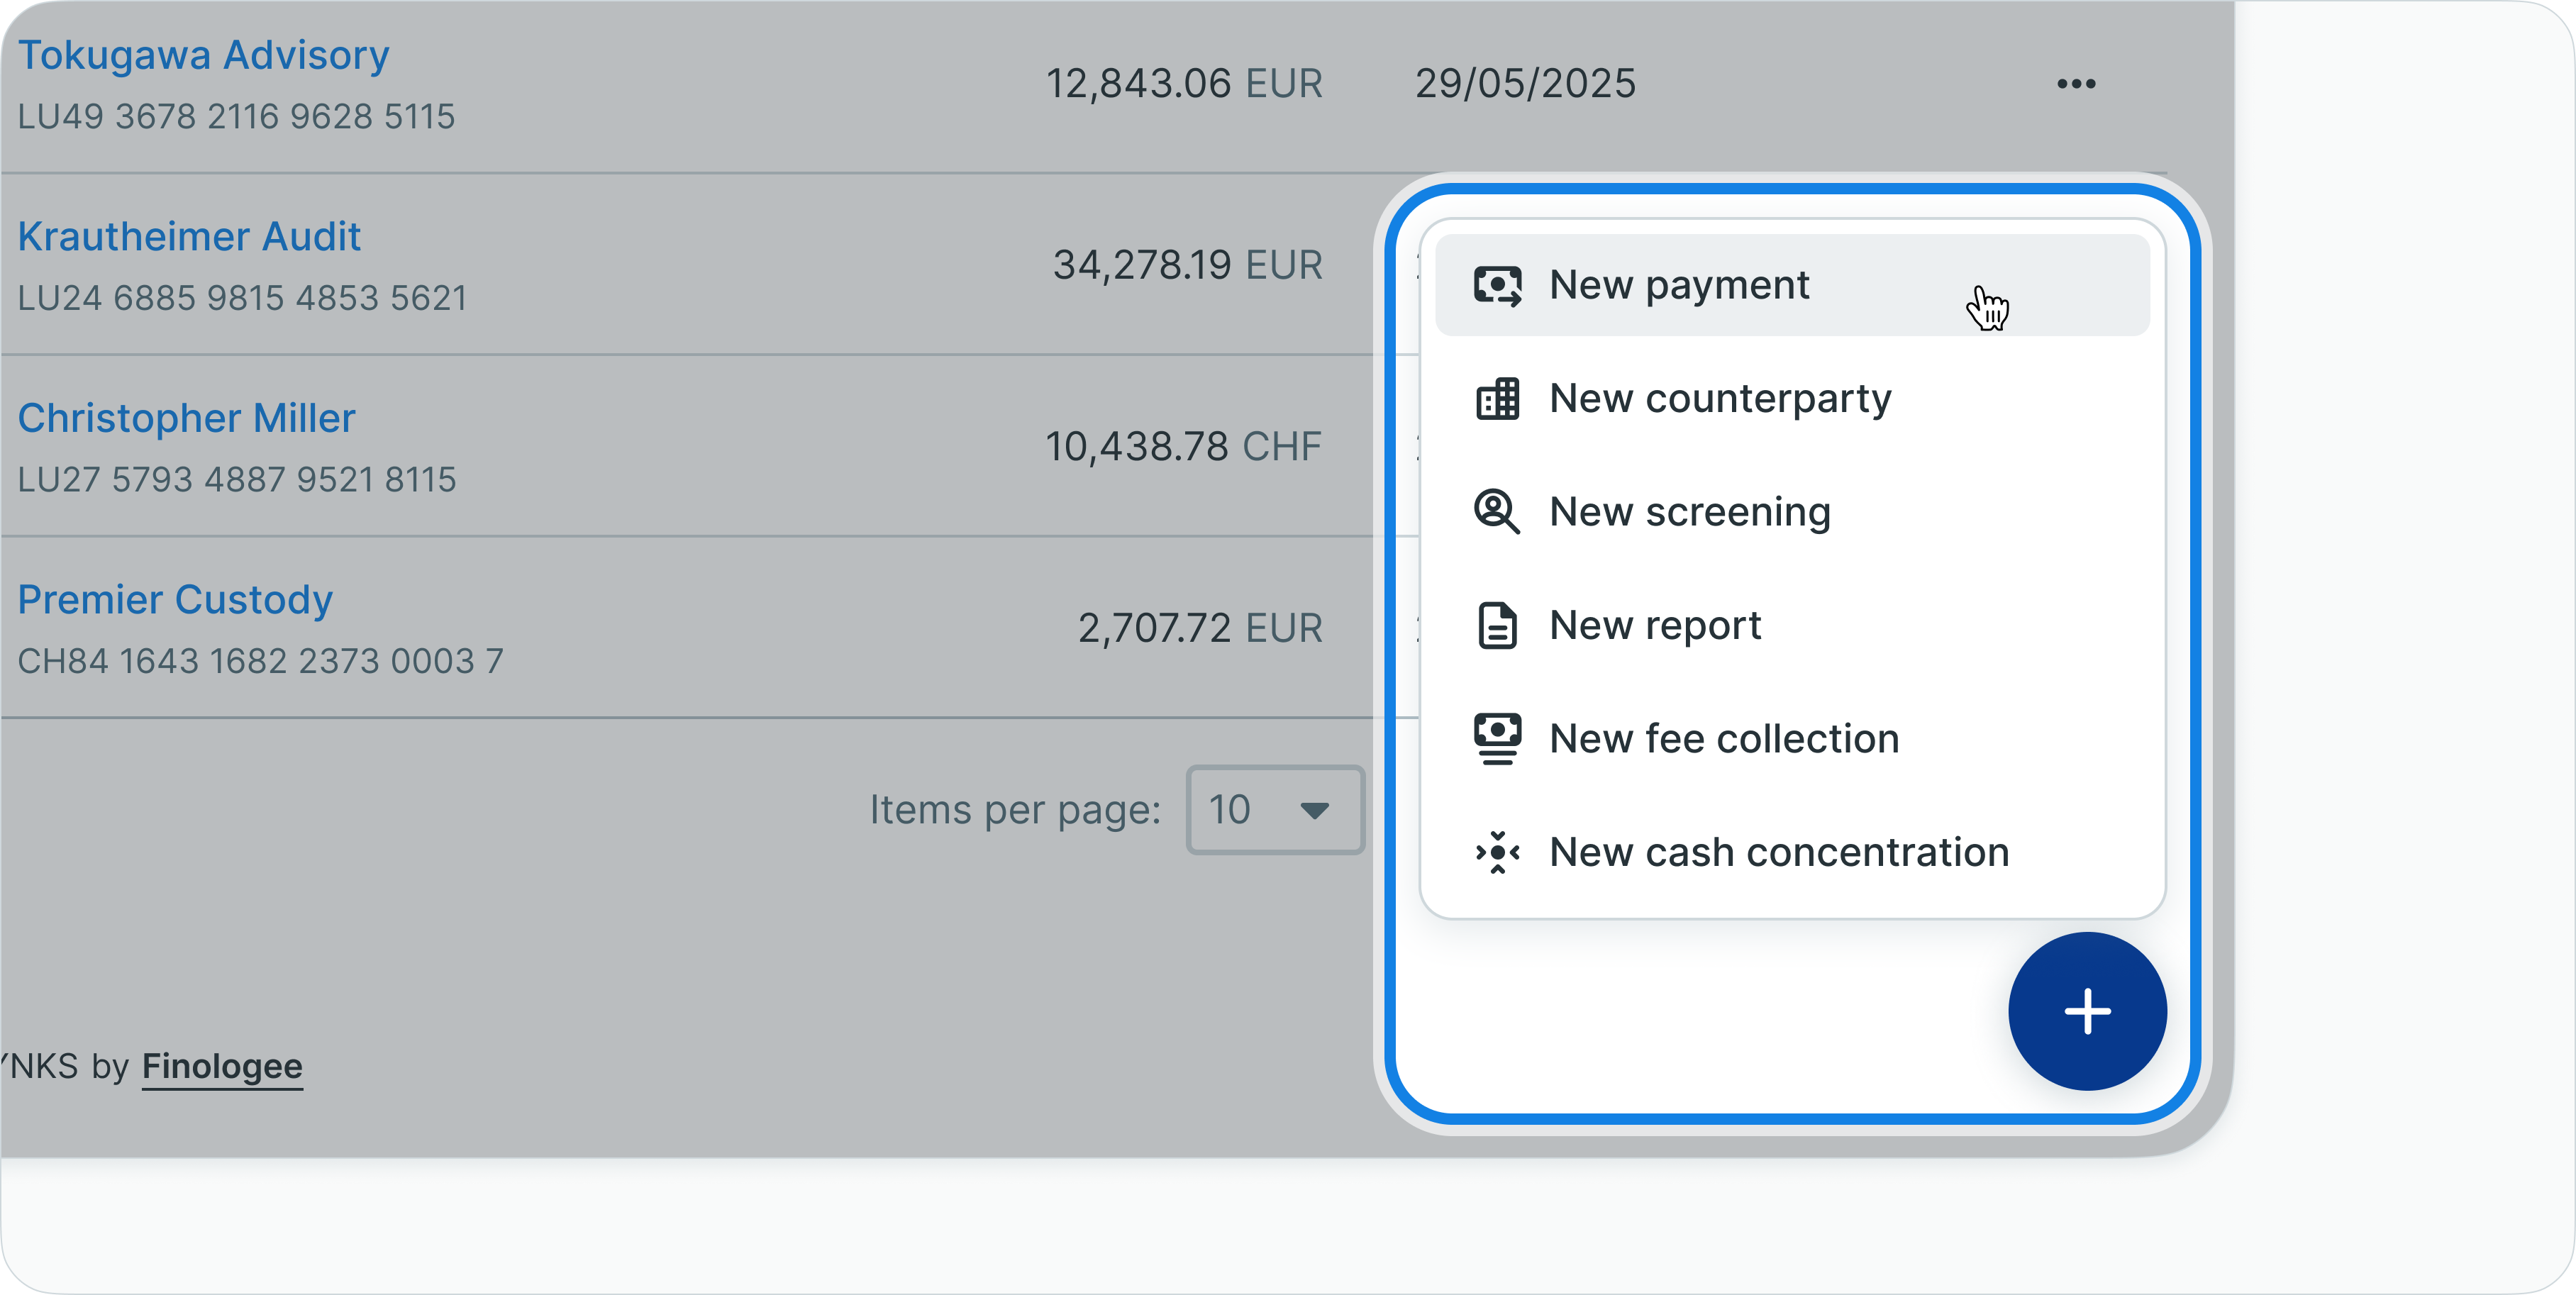
Payment creation menu
Payment type selection
Creating single credit transfers
To create an individual credit transfer:
- Click (+) and select Credit Transfer
- The "New credit transfer" screen opens, guiding you through required fields:
Step 1: Account selection
- Select the ordering party account (funds will be debited from this account)
- Select or create the beneficiary counterparty account (funds will be transferred to this account)
Step 2: Transaction amount
- Enter the payment amount
- Select the currency for the transfer
Step 3: Payment category
- Choose the appropriate payment category from available options
- Payment categories enable transaction categorization and tracking
Payment category selection
Step 4: Communication
- Enter payment reference information in the Communication field
- Include relevant reference numbers, descriptions, or instructions for the beneficiary
Step 5: Advanced options (optional)
Expand advanced options to configure additional parameters:
- Urgency
- Normal - Standard SEPA credit transfer
- Urgent - SEPA Instant credit transfer for faster settlement at the bank
- Requested authorization date - Deadline for signatories to approve the payment in LYNKS
- Requested execution date - Date when the bank should execute the payment
Advanced payment options
Completing payment creation
After filling all required fields, choose an action:
- Cancel - Abort payment creation and return to previous screen without saving
- Save draft - Store payment as draft for later editing or submission
- Send for authorization - Submit payment immediately for signature collection
Send for authorization button
Once submitted for authorization, designated signatories receive notifications about the pending payment.
Uploading bulk payment files
To create multiple payments simultaneously:
- Click (+) and select Upload file for multiple credit transfers
- Drag and drop your payment file or click to browse
- Supported file formats:
- PAIN.001 XML (ISO 20022)
- CSV format (according to LYNKS template)
- XLSX format (according to LYNKS template)
- The system validates the file and creates individual credit transfers
- Review validation results and correct any errors
- Submit for authorization or save as drafts
Batch booking creationWhen uploading files where all payments share common attributes (same account, currency, dates, category), the system creates a batch booking. For information about batch bookings, see Groups and Batches - Organizing payments and bulk processing.
Multi-currency account support
For foreign exchange payments from multi-currency accounts, bulk upload files support two additional optional fields that enable precise identification of which currency line to use:
- Ordering Party Account Currency - Specifies the currency to debit from the ordering account
- Ordering Party BIC - Identifies the specific BIC when multiple BIC codes share the same IBAN
These fields enable unique identification of ordering accounts when multiple currency lines or BIC codes are associated with the same IBAN. The platform validates ordering accounts using IBAN, BIC, and currency parameters together, ensuring each payment debits the correct account line.
Managing draft payments
Draft payments allow users to save payment information without submitting for authorization, enabling preparation of payments for future submission.
Creating drafts
To save a payment as draft:
- Create a new credit transfer following the creation workflow
- Fill in payment details
- Click Save draft instead of Send for authorization
- The payment saves with status "Draft"
Editing drafts
To modify a draft payment:
- Navigate to the Credit Transfers list
- Apply filter to show only "Draft" status payments
- Click the draft payment row to open payment details
- Click the Edit button (typically in the top right of the details screen)
- Modify payment fields as needed
- Choose to:
- Save draft - Store updated information
- Send for authorization - Submit the modified payment
- Cancel - Discard changes and return to payment details
Deleting drafts
To remove a draft payment:
- Open the draft payment details
- Click the overflow menu (three dots) or find the Delete action
- Confirm deletion when prompted
- The draft payment is permanently removed
Authorizing credit transfers
Credit transfers require authorization according to configured signatory rules before the system can transmit them to the bank.
Reviewing pending authorizations
To find payments requiring your signature:
- Navigate to the Action Center from the main menu
- Review the Payments section showing pending authorizations by urgency:
- Overdue - Requiring immediate attention
- Due soon - Due within next 7 days
- Due later - Due after 7 days
- Click a counter to view pre-filtered list of payments requiring authorization
Alternatively, access pending authorizations directly:
- Navigate to Credit Transfers from the main menu
- Apply filter: Status = "Waiting for signature(s)"
- Review payments requiring authorization
Providing signatures
To authorize a credit transfer:
- Open the payment details by clicking the payment row
- Review all payment information carefully:
- Ordering party and counterparty details
- Amount and currency
- Payment category and reference
- Requested execution date
- Verify counterparty risk level indicator
- Check attached documents for supporting evidence
- Click the Authorize or Sign button
- Complete authentication according to your configured method:
- LYNKS Mobile App approval
- LuxTrust token or signing stick
- SSO authentication
- Confirm the signature
The payment status updates automatically once you provide your signature. If additional signatures are required, the payment remains in "Waiting for signature(s)" status until all required signatories approve.
Rejecting payments
To reject a payment during authorization:
- Open the payment details
- Click the Reject button
- Optionally provide a rejection reason
- Confirm rejection
The payment status changes to "Rejected by signatory" and the creator receives notification.
Authorization workflowsFor detailed information about signatory rules, approval workflows, and authentication methods, see:
- Approvals - How approval workflows and signature processes function - Authorization workflows and signatory requirements
- Signatory Rules - Approval workflow configuration - Configuring authorization rules
- Authentication Methods - Detailed setup and usage of SSO, LuxTrust, and mobile app authentication - Signature methods and security
Attaching documents
Supporting documentation provides context and evidence for payment authorization and audit purposes.
Adding documents to payments
To attach files to a credit transfer:
- Open the payment details
- Scroll to the Documents section
- Click Add document or Upload button
- Choose the document type:
- Upload file - Attach PDF files from your local system
- Add link - Provide URL to web-hosted documents
- Select the file or enter the URL
- Optionally add a description
- Click Save or Add
The document appears in the documents section, visible to all users with access to the payment.
Downloading attached documents
To access attached documentation:
- Open the payment details
- Navigate to the Documents section
- Click the download icon next to the desired document
- The file downloads to your local system
Removing documents
To delete attached documents:
- Open the payment details (payment must be in editable status)
- Navigate to the Documents section
- Click the delete icon or overflow menu on the document
- Confirm deletion
Monitoring payment status
LYNKS provides multiple tools for tracking credit transfer progress through the payment lifecycle.
Viewing status in credit transfers list
To check payment status:
- Navigate to Credit Transfers from the main menu
- Locate the Status column in the table
- Observe the status indicator and text for each payment
Payment status in credit transfers list
Status colors provide quick visual indication:
- Gray - Draft or pending internal actions
- Blue - In authorization or bank processing
- Yellow - Pending execution or attention required
- Green - Successfully executed
- Red - Failed or rejected
Using status filters
To focus on payments in specific statuses:
- Open the Credit Transfers list
- Click the filter controls
- Select Status filter
- Choose one or multiple statuses to display
- The list updates to show only matching payments
Credit transfers list with status filter applied
Viewing detailed status progression
To see complete payment lifecycle:
- Open payment details by clicking a payment row
- Review the Timeline section showing all four stages:
- Creation
- Authorization
- Bank transfer
- Execution
- Each stage displays relevant information and timestamps
- The timeline provides complete visibility into payment progress
For detailed status definitions and meanings, see the Status definitions section below.
Credit transfers list
The credit transfers list displays all outgoing payments in a comprehensive table format, enabling users to view essential payment information and access detailed views for individual transactions.
Information displayed
The credit transfers list includes:
- Transaction reference number
- Ordering party account (IBAN)
- Counterparty name and account information
- Payment amount and currency
- Requested execution date
- Payment urgency (normal, urgent, ASAP)
- Current status with visual indicators
- Payment category
- Value date
- Creation date and creator
Table functionality
The credit transfers list supports standard table features:
- Column customization - Show, hide, reorder, and resize columns to display all relevant details
- Filtering - Apply filters by status, account, counterparty, date ranges, amount ranges, currency, urgency, and category
- Search - Quick search across transaction references, counterparty names, and communication fields
- Sorting - Sort by any column to organize payment information
- Bulk actions - Select multiple transactions for batch operations
- View persistence - Save customized table configurations for future sessions
Related functionalityFor detailed information about table features, filtering, and view customization, see Platform Navigation - Detailed guide to the head-up display, table views, filters, and search functionality.
Credit transfer details
Selecting a credit transfer from the list opens the payment details screen, presenting comprehensive information organized into dedicated sections. This single-page view consolidates all payment-related data, enabling users to understand the complete payment context and history.
Credit transfer details view - part 1
Credit transfer details view - part 2
Payment information and status
The top section displays critical payment information with status-specific details:
- Transaction reference displayed prominently
- Current status with descriptive alert and status color
- Ordering party account details (IBAN, BIC, balance)
- Payment amount, urgency indicator, and currency
- Counterparty account information (name, IBAN, BIC, risk level)
- Management action buttons positioned for quick access
Payment information and status section
Status-specific displayThe information displayed varies according to the payment's current status, showing relevant data and available actions appropriate to each processing stage.
Timeline visualization
The timeline section presents a visual representation of the payment's progress through four major stages, capturing the evolution of status transitions with relevant metadata.
Timeline - authorization stage
Timeline stages
| Stage | Description |
|---|---|
| 1. Creation | Initial payment creation noted with creator details and timestamp, showing either draft status or immediate authorization submission |
| 2. Authorization | Overview of requested signatories eligible to authorize and tracking of received signatures for the payment |
| 3. Bank transfer | Status update showing immediate submission to the bank after authorization; weekend and holiday execution dates are automatically adjusted to the next banking day |
| 4. Execution | Final stage marked with full timeline color change, delivery timestamp, and value date confirmation |
Timeline - signatures collected
Timeline - pending delivery to bank
Timeline - manual transfer to bank
Timeline - executed successfully
Negative status tracking
For payments encountering issues (failed, cancelled, rejected), the timeline indicates where processing stopped and displays the latest performed action, providing clear visibility into workflow interruptions.
Manual status changes
In certain situations, you may need to manually adjust a payment's status after bank processing. This capability allows you to correct the payment status when bank feedback indicates a different outcome than what LYNKS recorded automatically.
When manual status changes are available
Manual status changes become available when:
- Payment status is Pending delivery to bank, Executed, or Not executed by bank
- You have the
PAYMENT_MANUAL_CHANGE_STATUSpermission for the payment's account and category - Payment was not created through depositary oversight
The Change status button appears in the execution stage (stage 4) of the timeline when these conditions are met.
Available status transitions
You can manually change payment status between:
- Executed → Not executed by bank - When bank confirms a payment marked as executed was actually rejected
- Not executed by bank → Executed - When bank confirms a payment marked as rejected was actually executed
- Pending delivery to bank → Executed - When bank confirms execution without providing automated feedback
- Pending delivery to bank → Not executed by bank - When bank confirms rejection without providing automated feedback
Changing payment status manually
To manually change a payment's status:
- Open the payment details page
- Scroll to the Timeline section
- Locate the execution stage (stage 4)
- Click Change status button
- In the status change dialog:
- Select the new status from available options
- Enter a comment explaining the reason for the manual change (optional, max 255 characters)
- If changing to Executed, provide the Value date for the payment
- Click Save to apply the status change
The payment status updates immediately and the change is recorded in the audit log with your comment and timestamp
Status change dialog
Status change restrictionsOnce you manually change a payment's status, automatic bank feedback updates will no longer modify that payment's status. This prevents LYNKS from overwriting your manual correction with potentially incorrect automated data.
Additional details
The additional details section provides comprehensive payment-specific information:
- Payment category assignment
- Value date
- Charge details (who bears bank charges)
- Correspondent bank BIC (when applicable)
- Credit transfer group association
- Payment communication text
- Number of credit transfers (for batch bookings)
- Standing order association (for recurring payments)
Additional details section
Documents
The documents section enables users to attach supporting documentation to payments, providing context and evidence for payment authorization and audit purposes.
Documents section
Document management
- Attach PDF files or web links to payments
- Download attached documents at any time
- Remove attachments when no longer needed
- Provide supporting evidence for compliance and authorization workflows
Audit log
The audit log maintains comprehensive traceability of all actions performed on the payment, creating a complete history for compliance and operational transparency.
Audit log section
Logged events
The audit log captures:
- All status transitions with timestamps
- Signature actions and authorizations
- Notification triggers
- Bank acknowledgments (ACK/NACK)
- Manual status changes with user comments
- Edit actions and modifications
- Complete end-to-end payment lifecycle
This detailed logging ensures users can access complete information about the latest updates and actions affecting the payment. Manual status changes include the user who made the change, timestamp, new status, and any comment provided explaining the reason for the change.
Status definitions
Credit transfers progress through defined statuses reflecting their position in the payment workflow. Understanding these statuses helps users monitor payment progress and take appropriate actions.
Payment statuses
| Status | Definition |
|---|---|
| Draft | Payment created and saved without authorization submission |
| Waiting for signature(s) | Payment requires authorization from designated signatories according to signatory rules |
| Rejected by signatory | Payment rejected by one or more authorized signatories during the approval process |
| Waiting for manual transfer to bank | Payment fully authorized, awaiting manual submission action to transfer to bank |
| Pending delivery to bank | Payment transmitted to bank, awaiting acknowledgment (ACK) receipt |
| Pending execution by bank | Bank acknowledged payment receipt (ACK), payment pending processing and execution |
| Executed | Bank confirmed successful payment execution and settlement (can also be set manually) |
| Failed | Bank rejected payment (NACK) due to validation errors or processing issues |
| Not executed by bank | Payment not executed by bank; status set manually after bank confirmation |
| Cancelled | Payment cancelled by user before execution |
Status transitionsSome statuses apply only to specific workflow scenarios. For example, "Waiting for manual transfer to bank" appears only when users select manual submission rather than automatic delivery.
Best practices
Follow these recommendations to maximize the effectiveness of credit transfer management:
- Customize list views - Configure column visibility and filters to match your monitoring priorities and save views for recurring analysis needs
- Monitor timeline regularly - Check payment timelines to identify authorization bottlenecks or delivery delays requiring attention
- Use search effectively - Leverage search functionality to quickly locate specific payments by reference, counterparty, or communication text
- Attach supporting documents - Add invoices, contracts, or approval emails to payments to provide context for signatories and audit trails
- Review audit logs - Check audit logs when investigating payment issues or verifying action history for compliance purposes
- Filter by status - Use status filters to focus on payments requiring action (drafts, waiting for signatures, failed payments)
- Track urgency - Monitor urgent and ASAP payments separately to ensure time-sensitive transfers receive priority handling
- Check counterparty risk - Review counterparty risk levels displayed in payment details to identify high-risk transactions requiring additional scrutiny
Related documentation
Explore related sections for more information:
- Platform Navigation - Detailed guide to the head-up display, table views, filters, and search functionality - Tables, filters, search, and view customization
- Permissions - Comprehensive explanation of access control and role-based permissions - Understanding access control and account scoping
- Approvals - How approval workflows and signature processes function - Authorization workflows and signatory rules
- Action Center - Centralized task and approval management - Pending authorizations and payment prioritization
- Dashboard - Financial overview widgets, charts, and real-time monitoring - Payment overview widgets and analytics
- Transaction History - Review incoming payment details - Complete transaction records across accounts
- Groups and Batches - Organizing payments and bulk processing - Organizing payments and bulk processing
- Standing Orders - Configure recurring payments - Recurring payment automation
- Counterparties - Investor and beneficiary management - Beneficiary management and approval
- Signatory Rules - Approval workflow configuration - Configuring authorization requirements
- Authentication Methods - Detailed setup and usage of SSO, LuxTrust, and mobile app authentication - Signature methods and security
Support
For assistance with credit transfers or questions about payment processing, contact [email protected].
Updated about 2 months ago