Users & Groups
Manage user accounts, configure permissions, organize users into groups, and control access through centralized user management and SCIM provisioning
Introduction
The users and groups settings enable administrators to manage user accounts, configure permissions, organize users into groups, and control access to LYNKS features and resources. This centralized management interface provides complete oversight of who can access your tenant, what actions they can perform, and how they authenticate.
Users can be created manually through the interface or automatically provisioned from external identity providers using SCIM 2.0 protocol. Permissions can be assigned directly to individual users or inherited through group membership, providing flexible access control that scales with your organization.
Prerequisites
Before managing users and groups, ensure you have the appropriate administrative permissions.
Permissions
| Permission | Description |
|---|---|
TENANT_SETTINGS_READ | View user and group configurations |
TENANT_SETTINGS_WRITE | Create, edit, and manage users and groups |
For the complete permission system documentation, see Permissions - Comprehensive explanation of access control and role-based permissions.
Feature flags
| Feature Flag | Description |
|---|---|
TENANT_SETTINGS_FOUR_EYES_REVIEW | When enabled, all changes to users and groups require approval before taking effect. See Pending Changes - Configuration change management. |
For feature flag information, see Feature Flags - Available features and enablement.
Users & groups overview
The users and groups management interface has been enhanced to provide clearer navigation and more intuitive workflows. The interface is organized into two main tabs accessible from Settings → Users:
- Users tab - Manage individual user accounts, permissions, authentication methods, and signatory group memberships
- User Groups tab - Manage groups, configure group-level permissions, and control group membership
This organization supports both individual user management and centralized group-based access control following role-based access control (RBAC) principles.
Users list
The users list provides a comprehensive overview of all configured users within your tenant. Each user entry displays key information for quick assessment of user status and access rights.
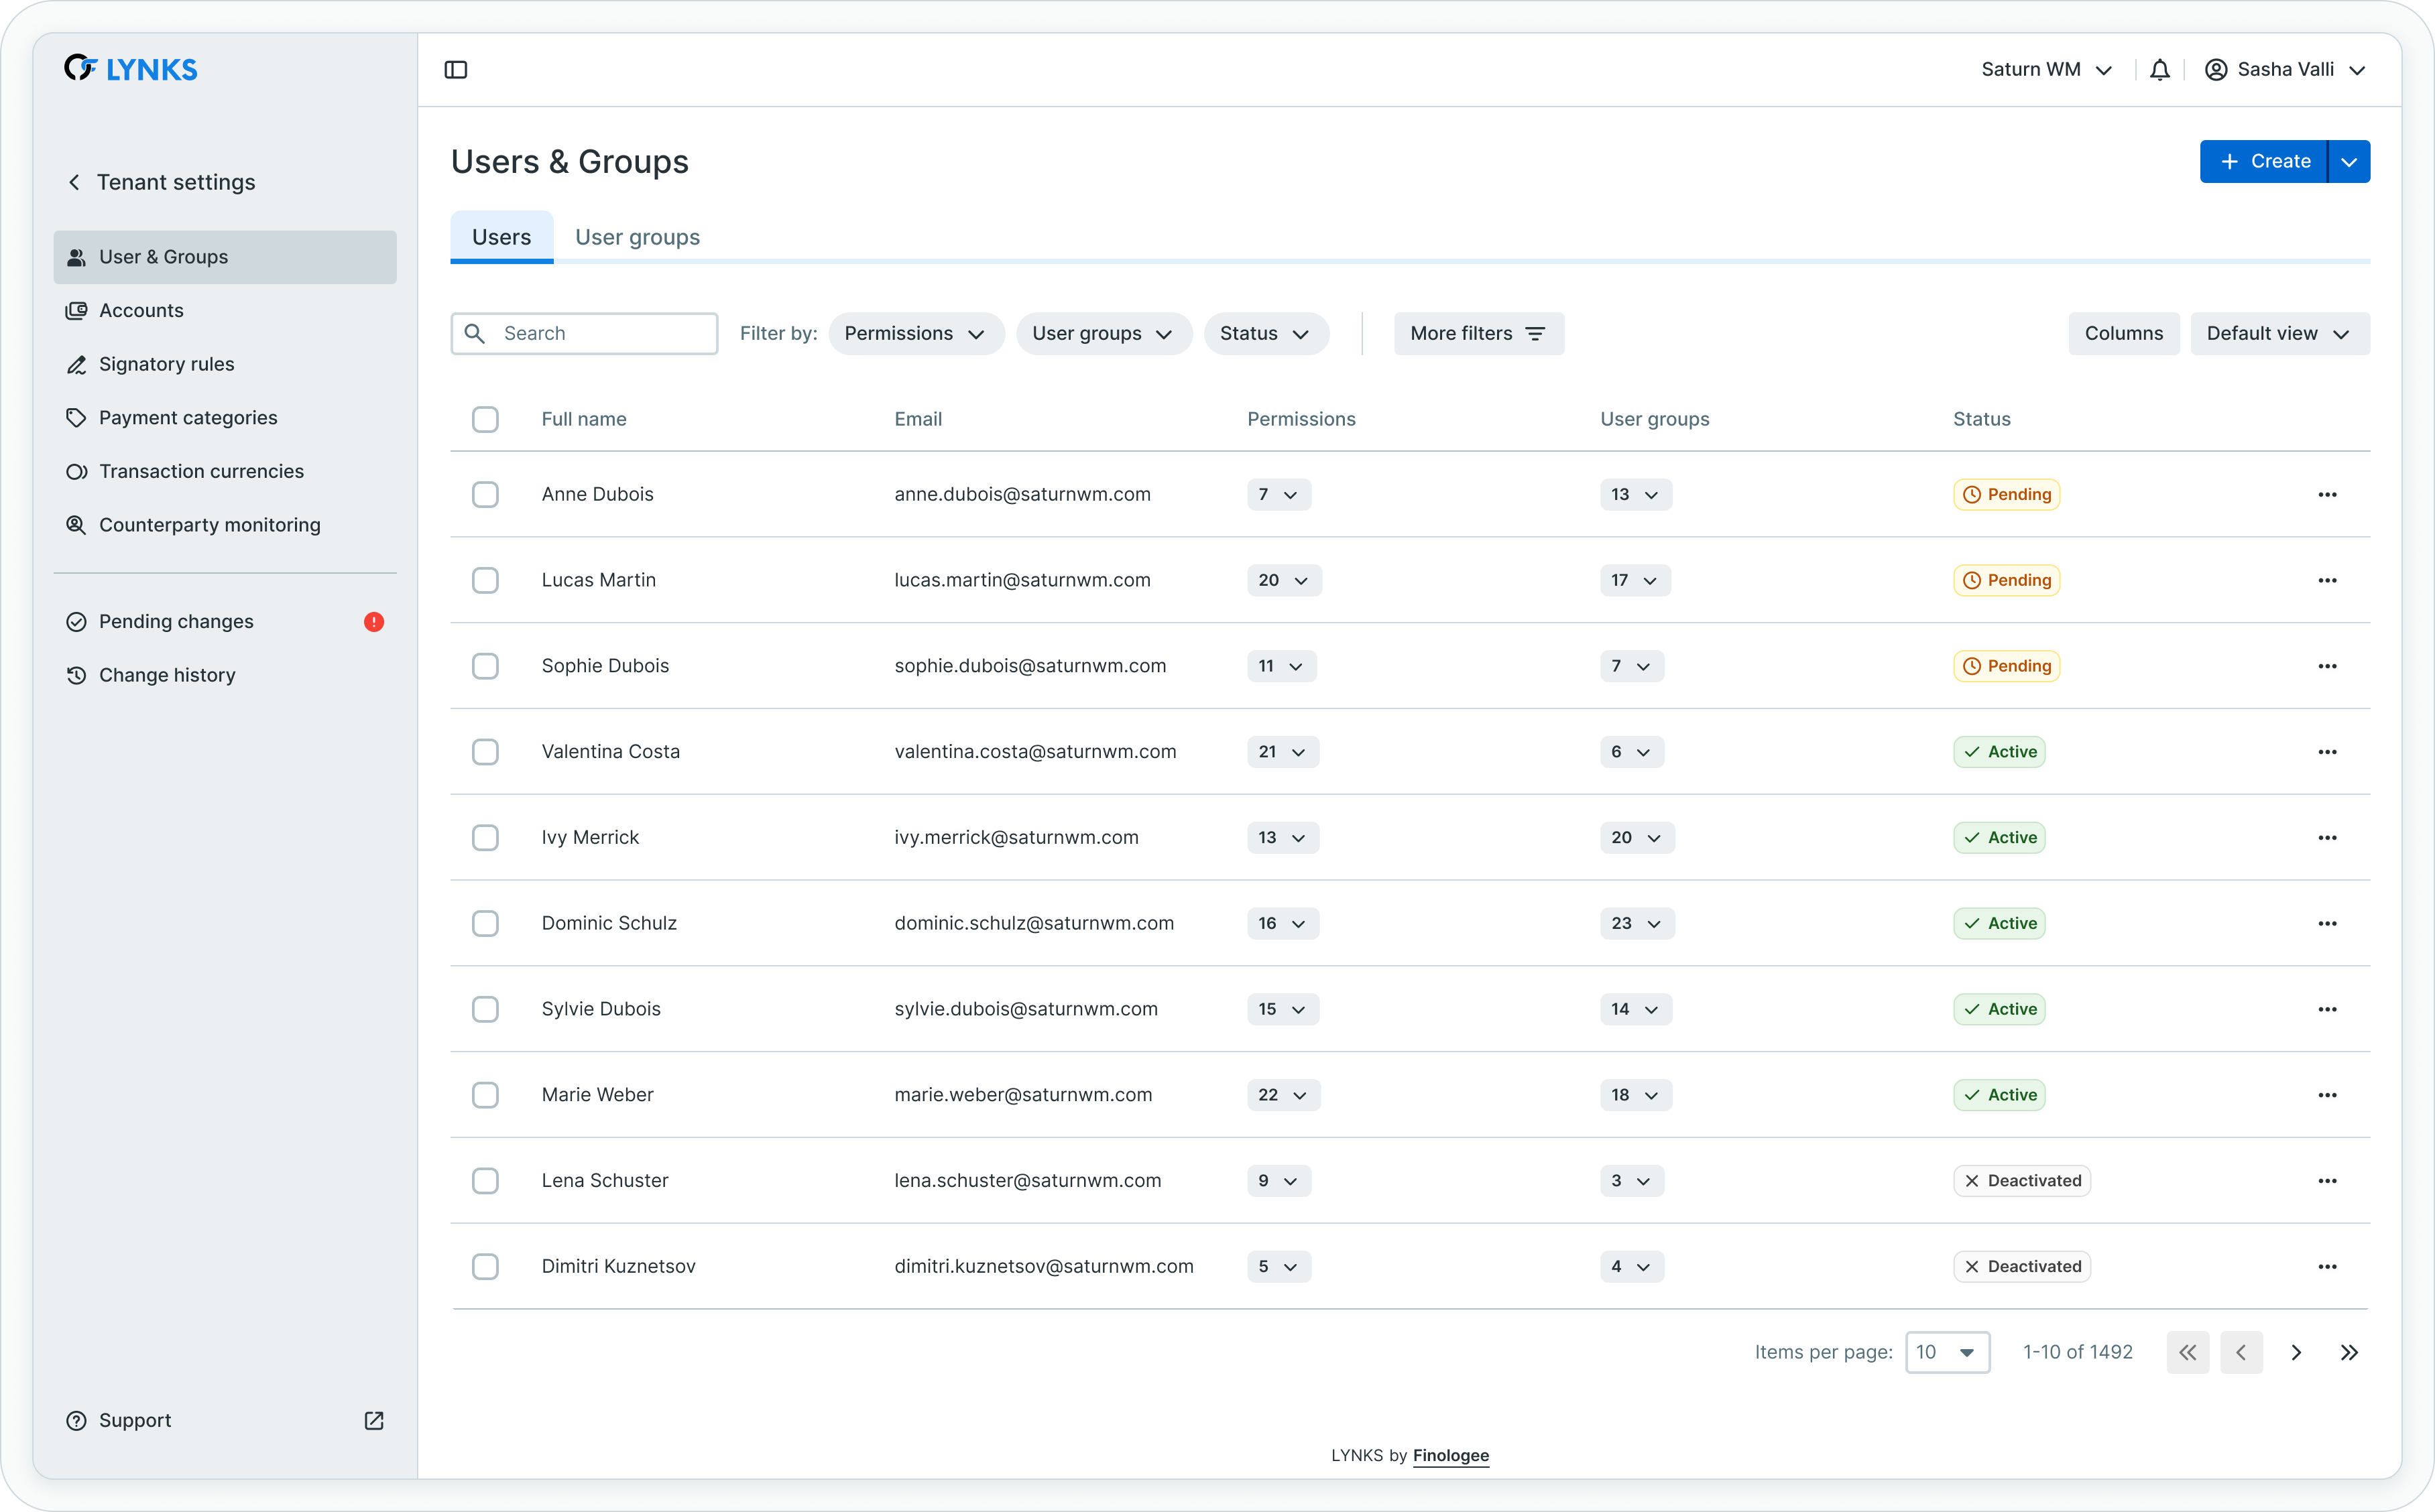
Users list showing name, email, permissions, signatory groups, and status
The list displays:
- Name - User's full name for identification
- Email - User's email address used for login and notifications
- Permission set - Assigned permission level or role summary
- Signatory groups - Groups where user has signature authority
- Status - Active, inactive, or pending activation
Users can filter and search the list to quickly locate specific users or identify users with particular permission sets or group memberships.
For users provisioned via SCIM from external identity providers, a special indicator is displayed to distinguish them from manually created users. These provisioned users have certain management restrictions as their core details are controlled by the identity provider.
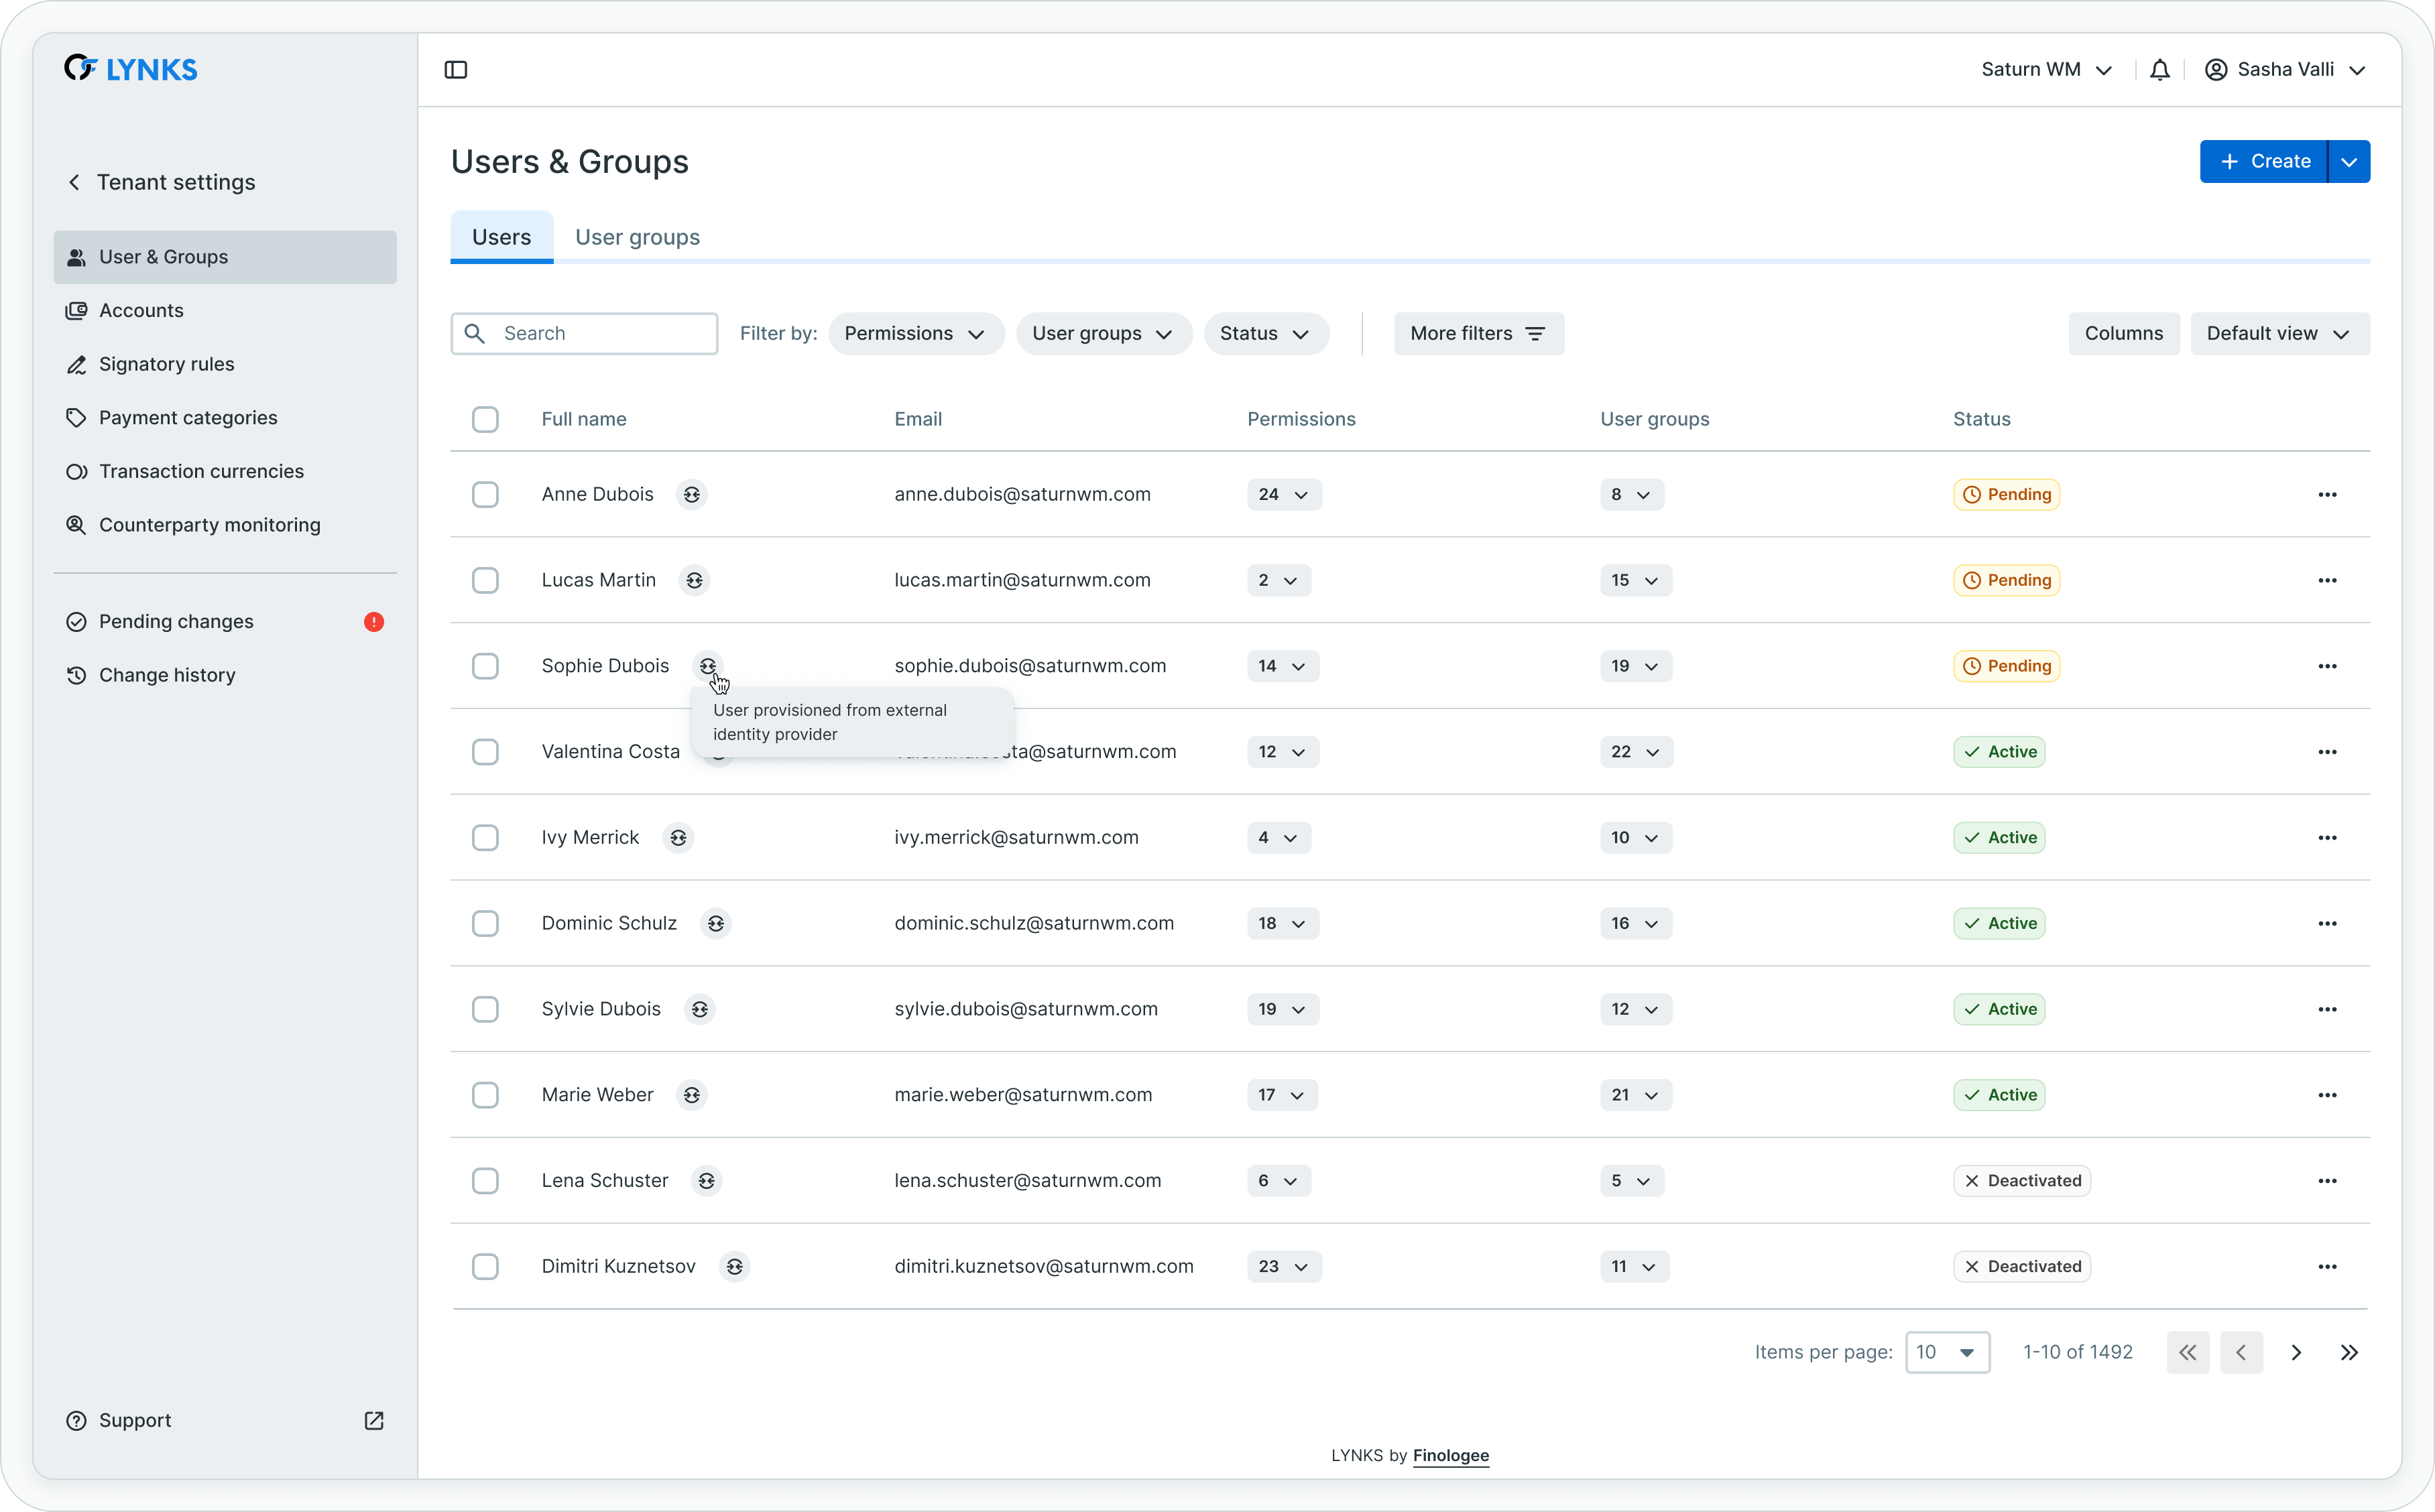
Provisioned users are marked with SCIM indicator showing external identity provider source
Creating a new user
Administrators can create new user accounts directly through the LYNKS interface. The user creation flow guides you through four steps to configure all necessary user details.
To create a new user, navigate to Settings → Users and click "New user" in the top right corner.
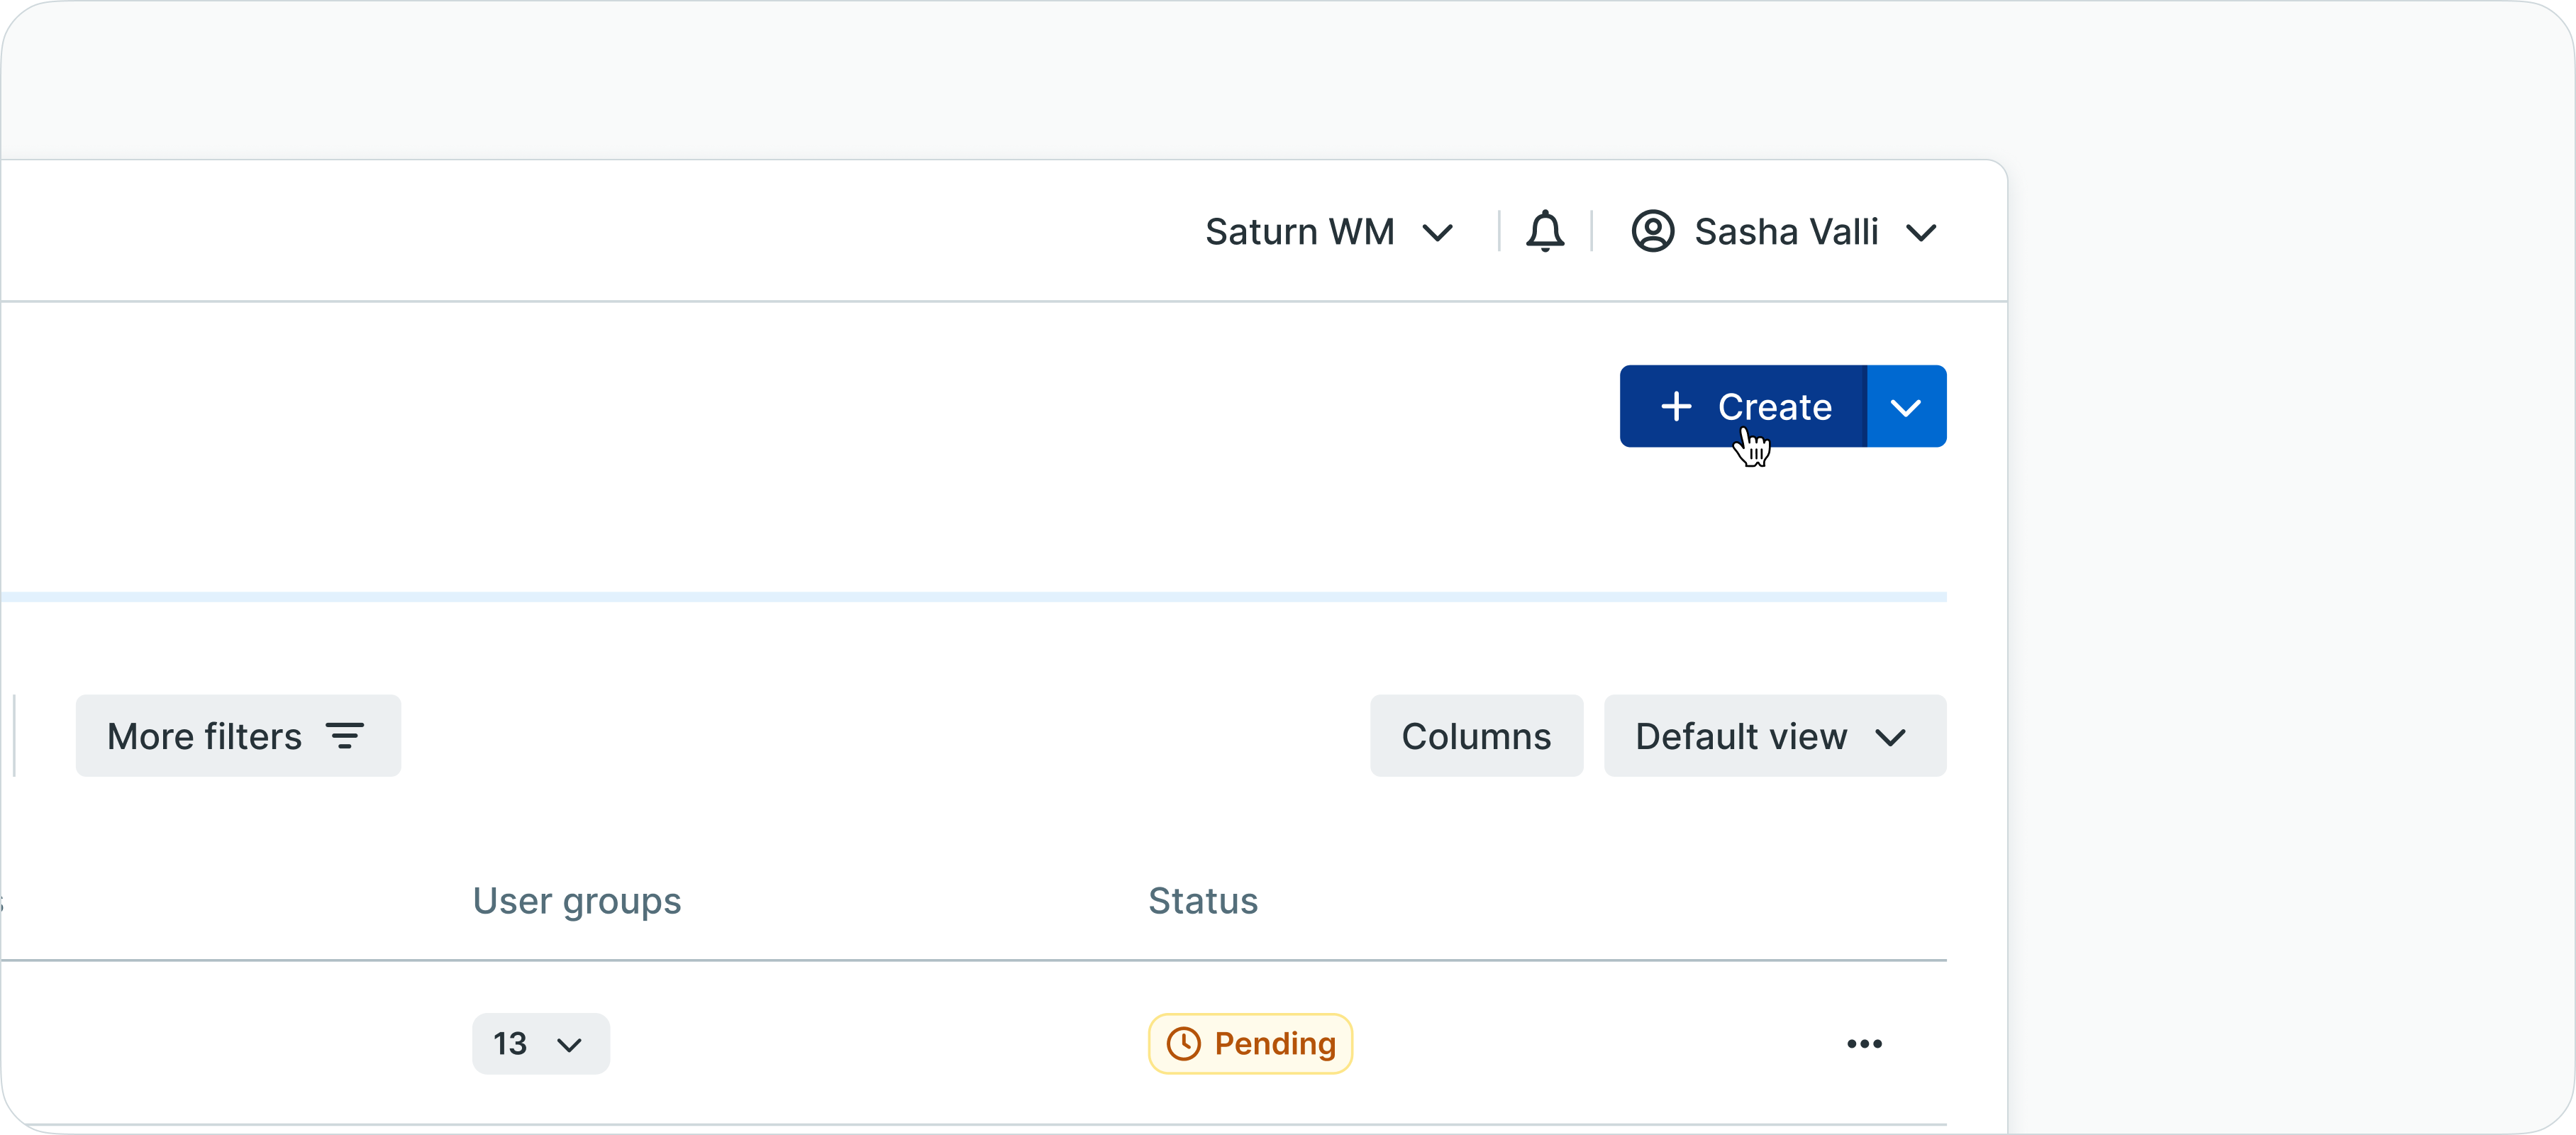
New user button location in users list
Step 1: personal information
The first step captures basic user information and preferences.
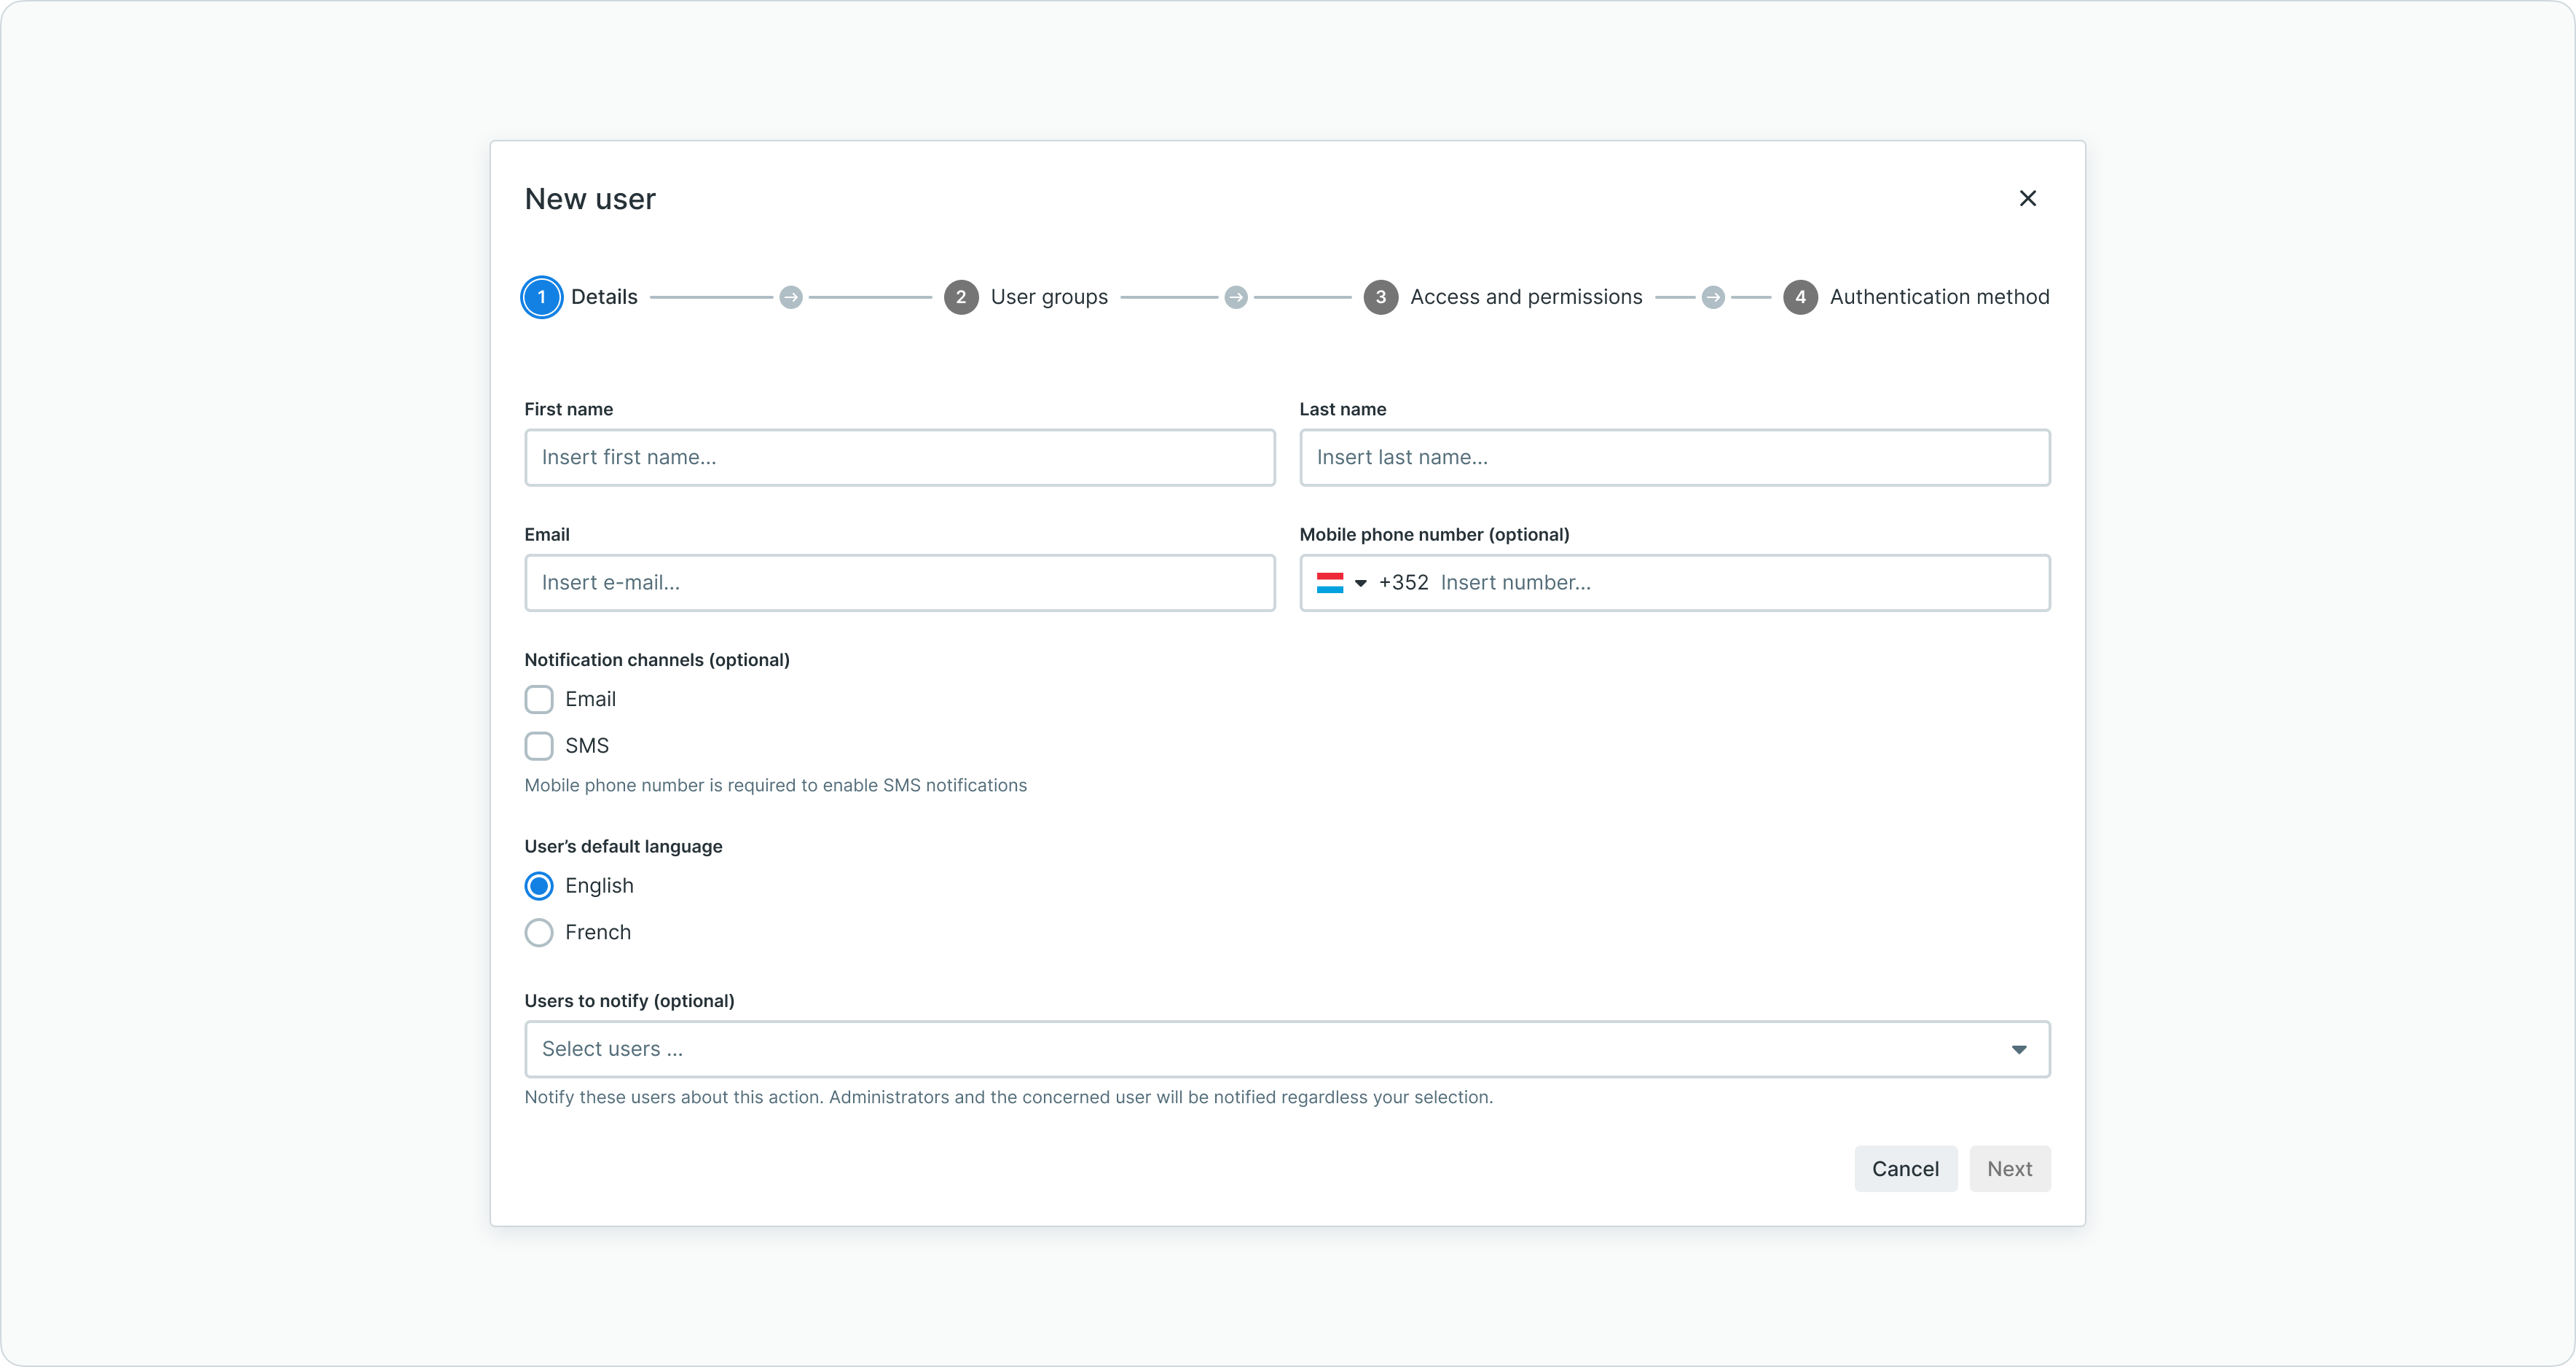
User creation step 1 showing personal information form
Configure:
- First name and last name - User's full name
- Email address - Used for login and notifications
- Phone number - Optional contact number
- Language preference - Interface language (English, French, German, Italian, etc.)
- Notification preferences - Email and SMS notification settings
Step 2: user groups and signatory rights
Define which user groups the new user belongs to. Group membership establishes both signatory authority and inherited permissions.
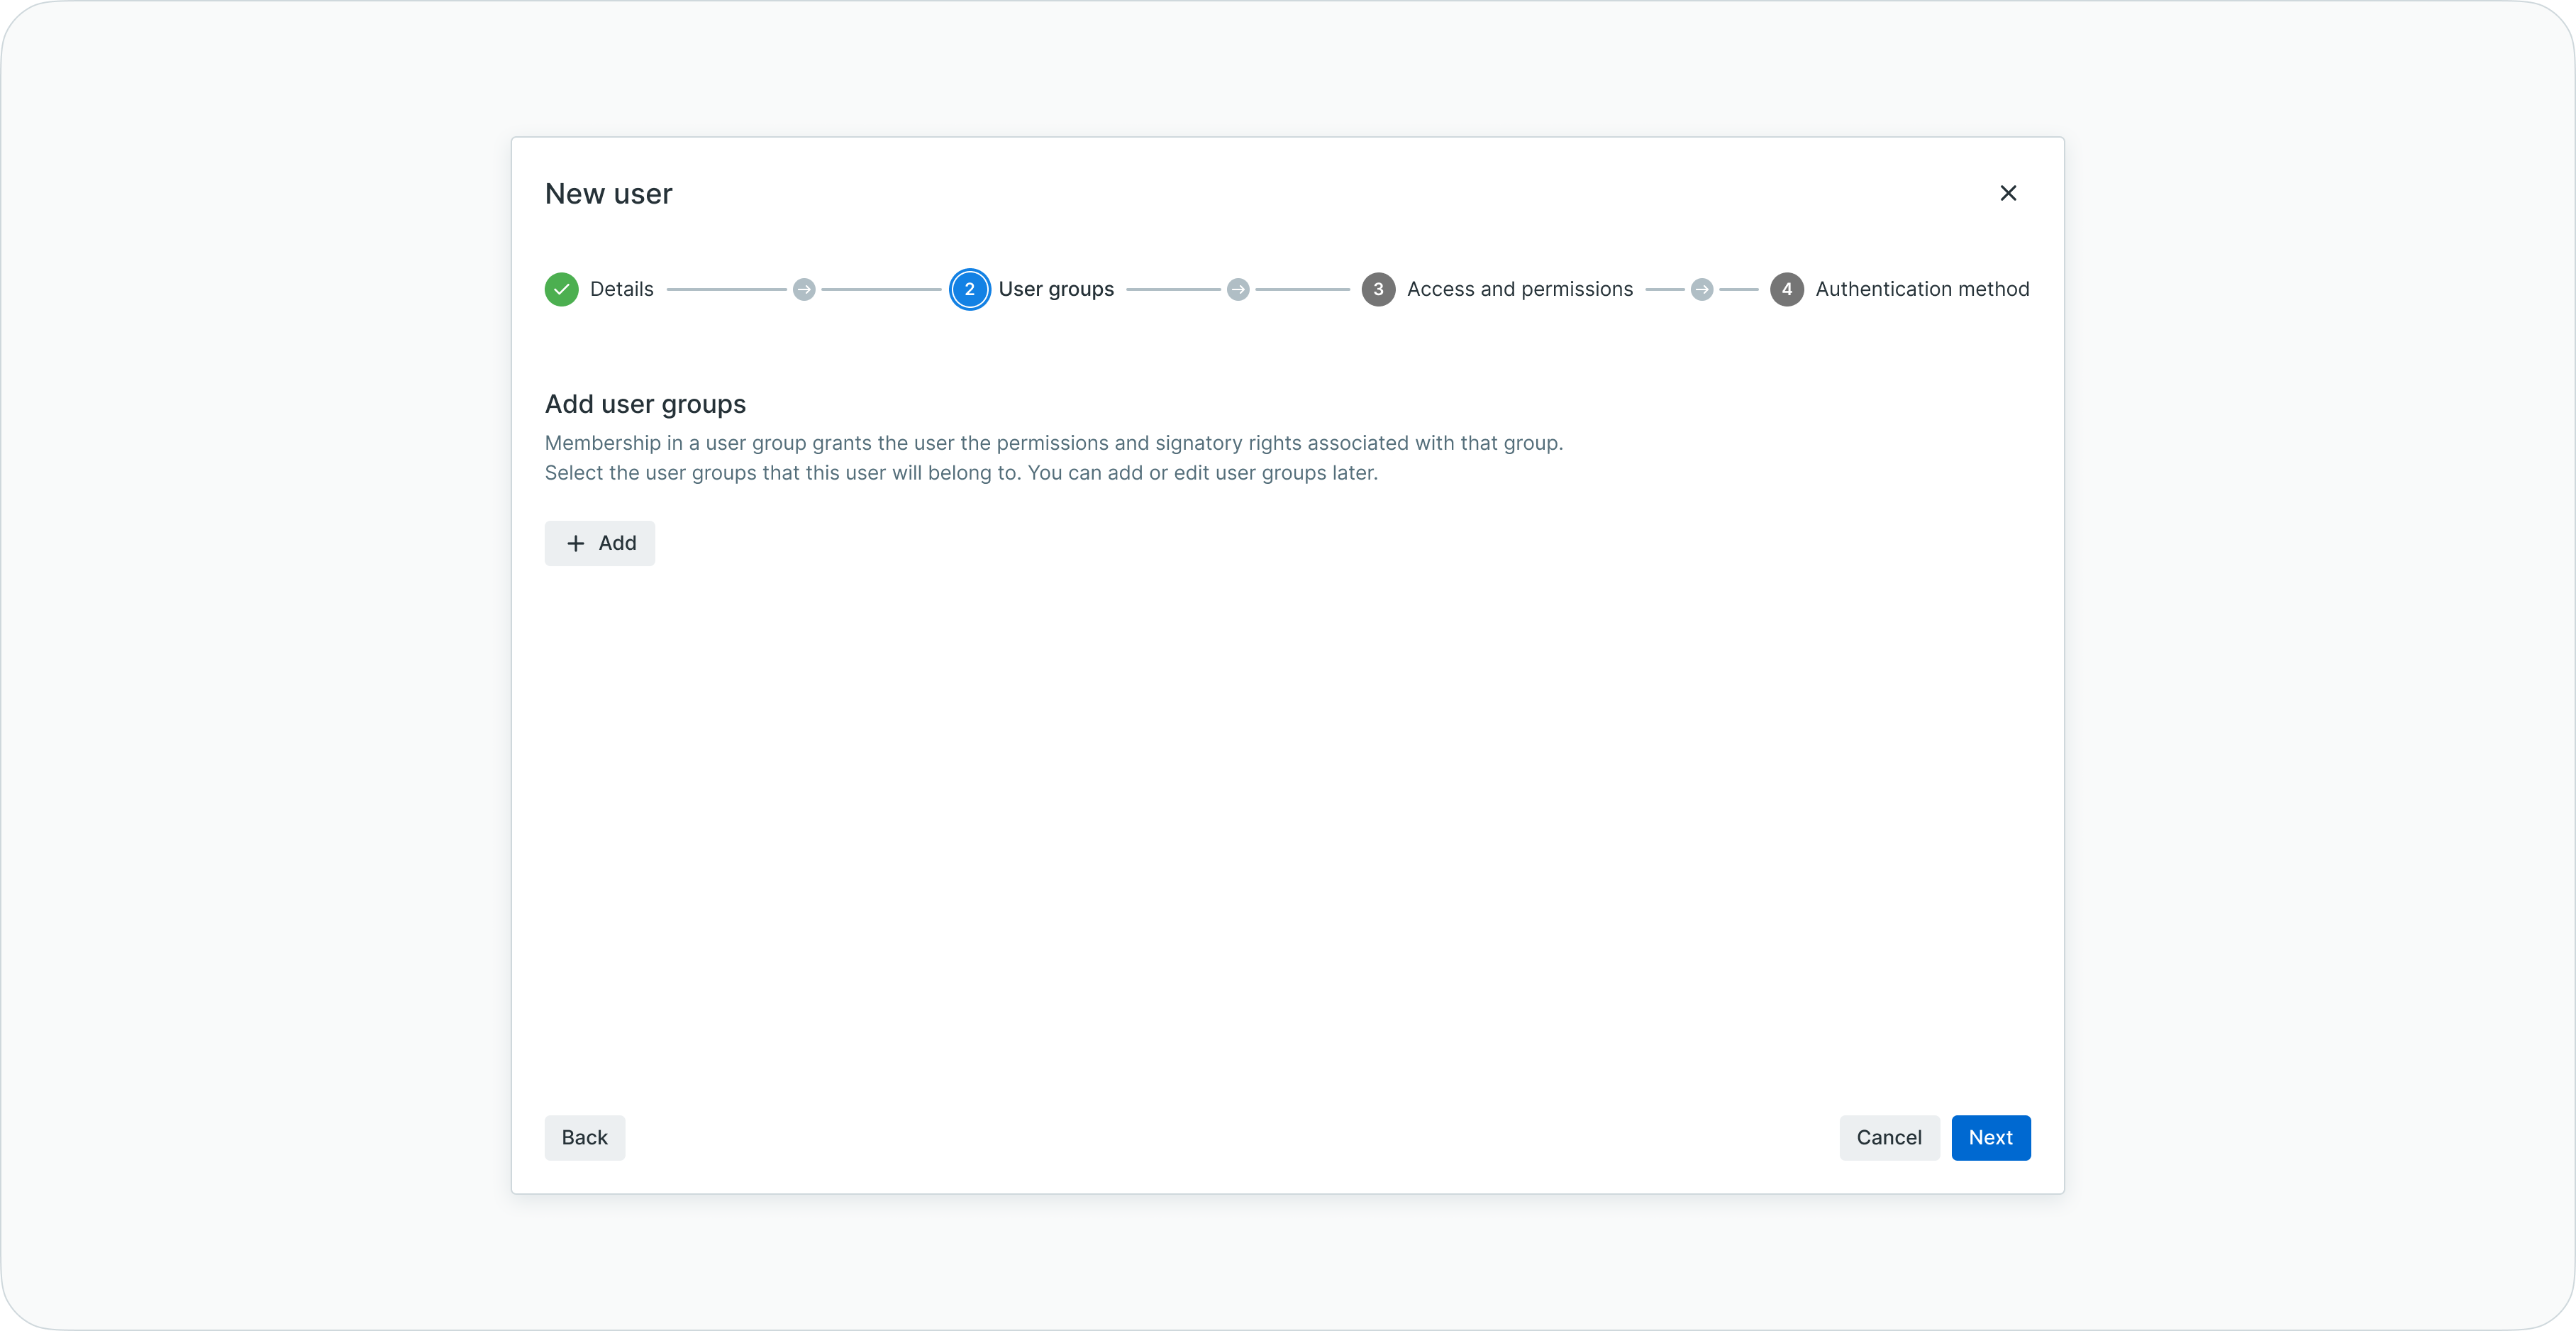
User creation step 2 for selecting user groups
Select groups that match the user's authorization level and responsibilities. Click "Add group" to assign the user to predefined groups.
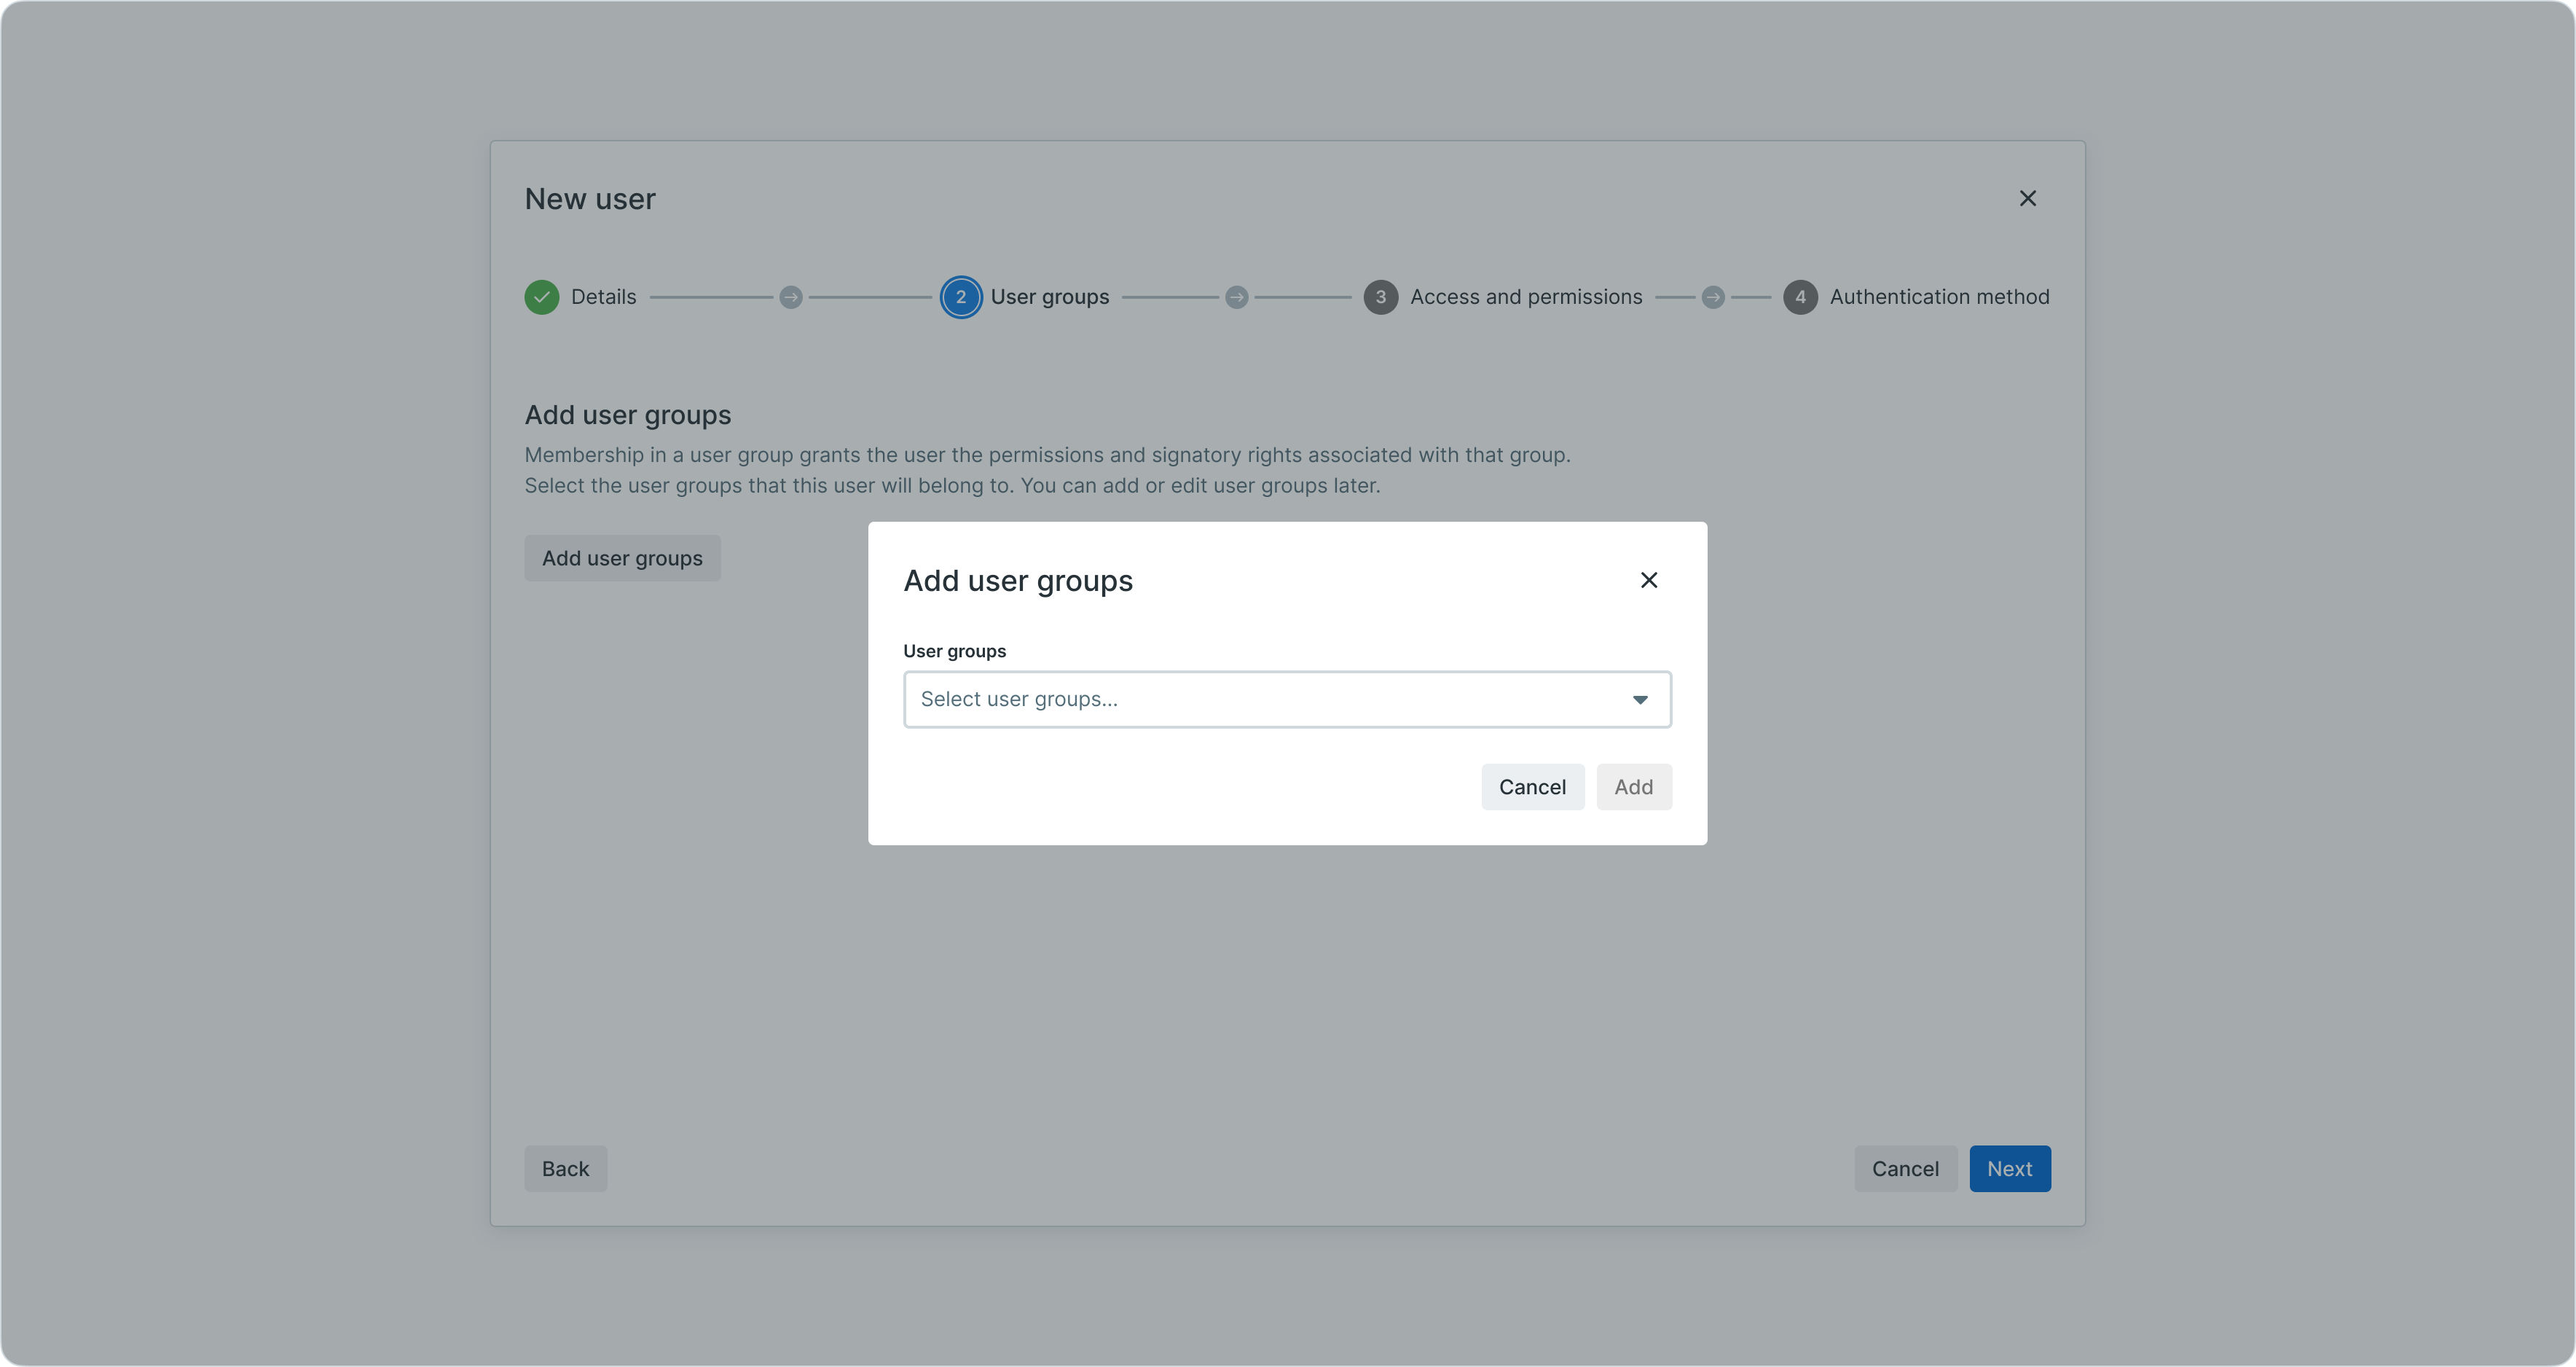
Adding user groups during user creation
Group membership provides two types of access:
Signatory authority - Groups associated with signatory rules grant the user authorization rights:
- Participation in payment approval workflows
- Authorization scope for accounts, amounts, and payment categories
- Notification preferences for pending signatures
Permission inheritance - Users automatically inherit all permissions assigned to their groups:
- Feature access rights (create payments, view reports, manage counterparties)
- Data access scope (accounts, payment categories, currencies, counterparties)
- Administrative capabilities (user management, configuration access)
Cumulative permissionsWhen users receive permissions from multiple sources (direct assignment in Step 3 plus group inheritance), the permissions are cumulative. The most expansive permission scope applies, ensuring users have all necessary access. For details on how permission inheritance works, see Permissions - Comprehensive explanation of access control and role-based permissions.
For detailed information about signatory rules and approval workflows, see Signatory Rules - Approval workflow configuration and Approvals - How approval workflows and signature processes function.
Step 3: access and permissions
Configure granular access permissions controlling what the user can view and perform in LYNKS.
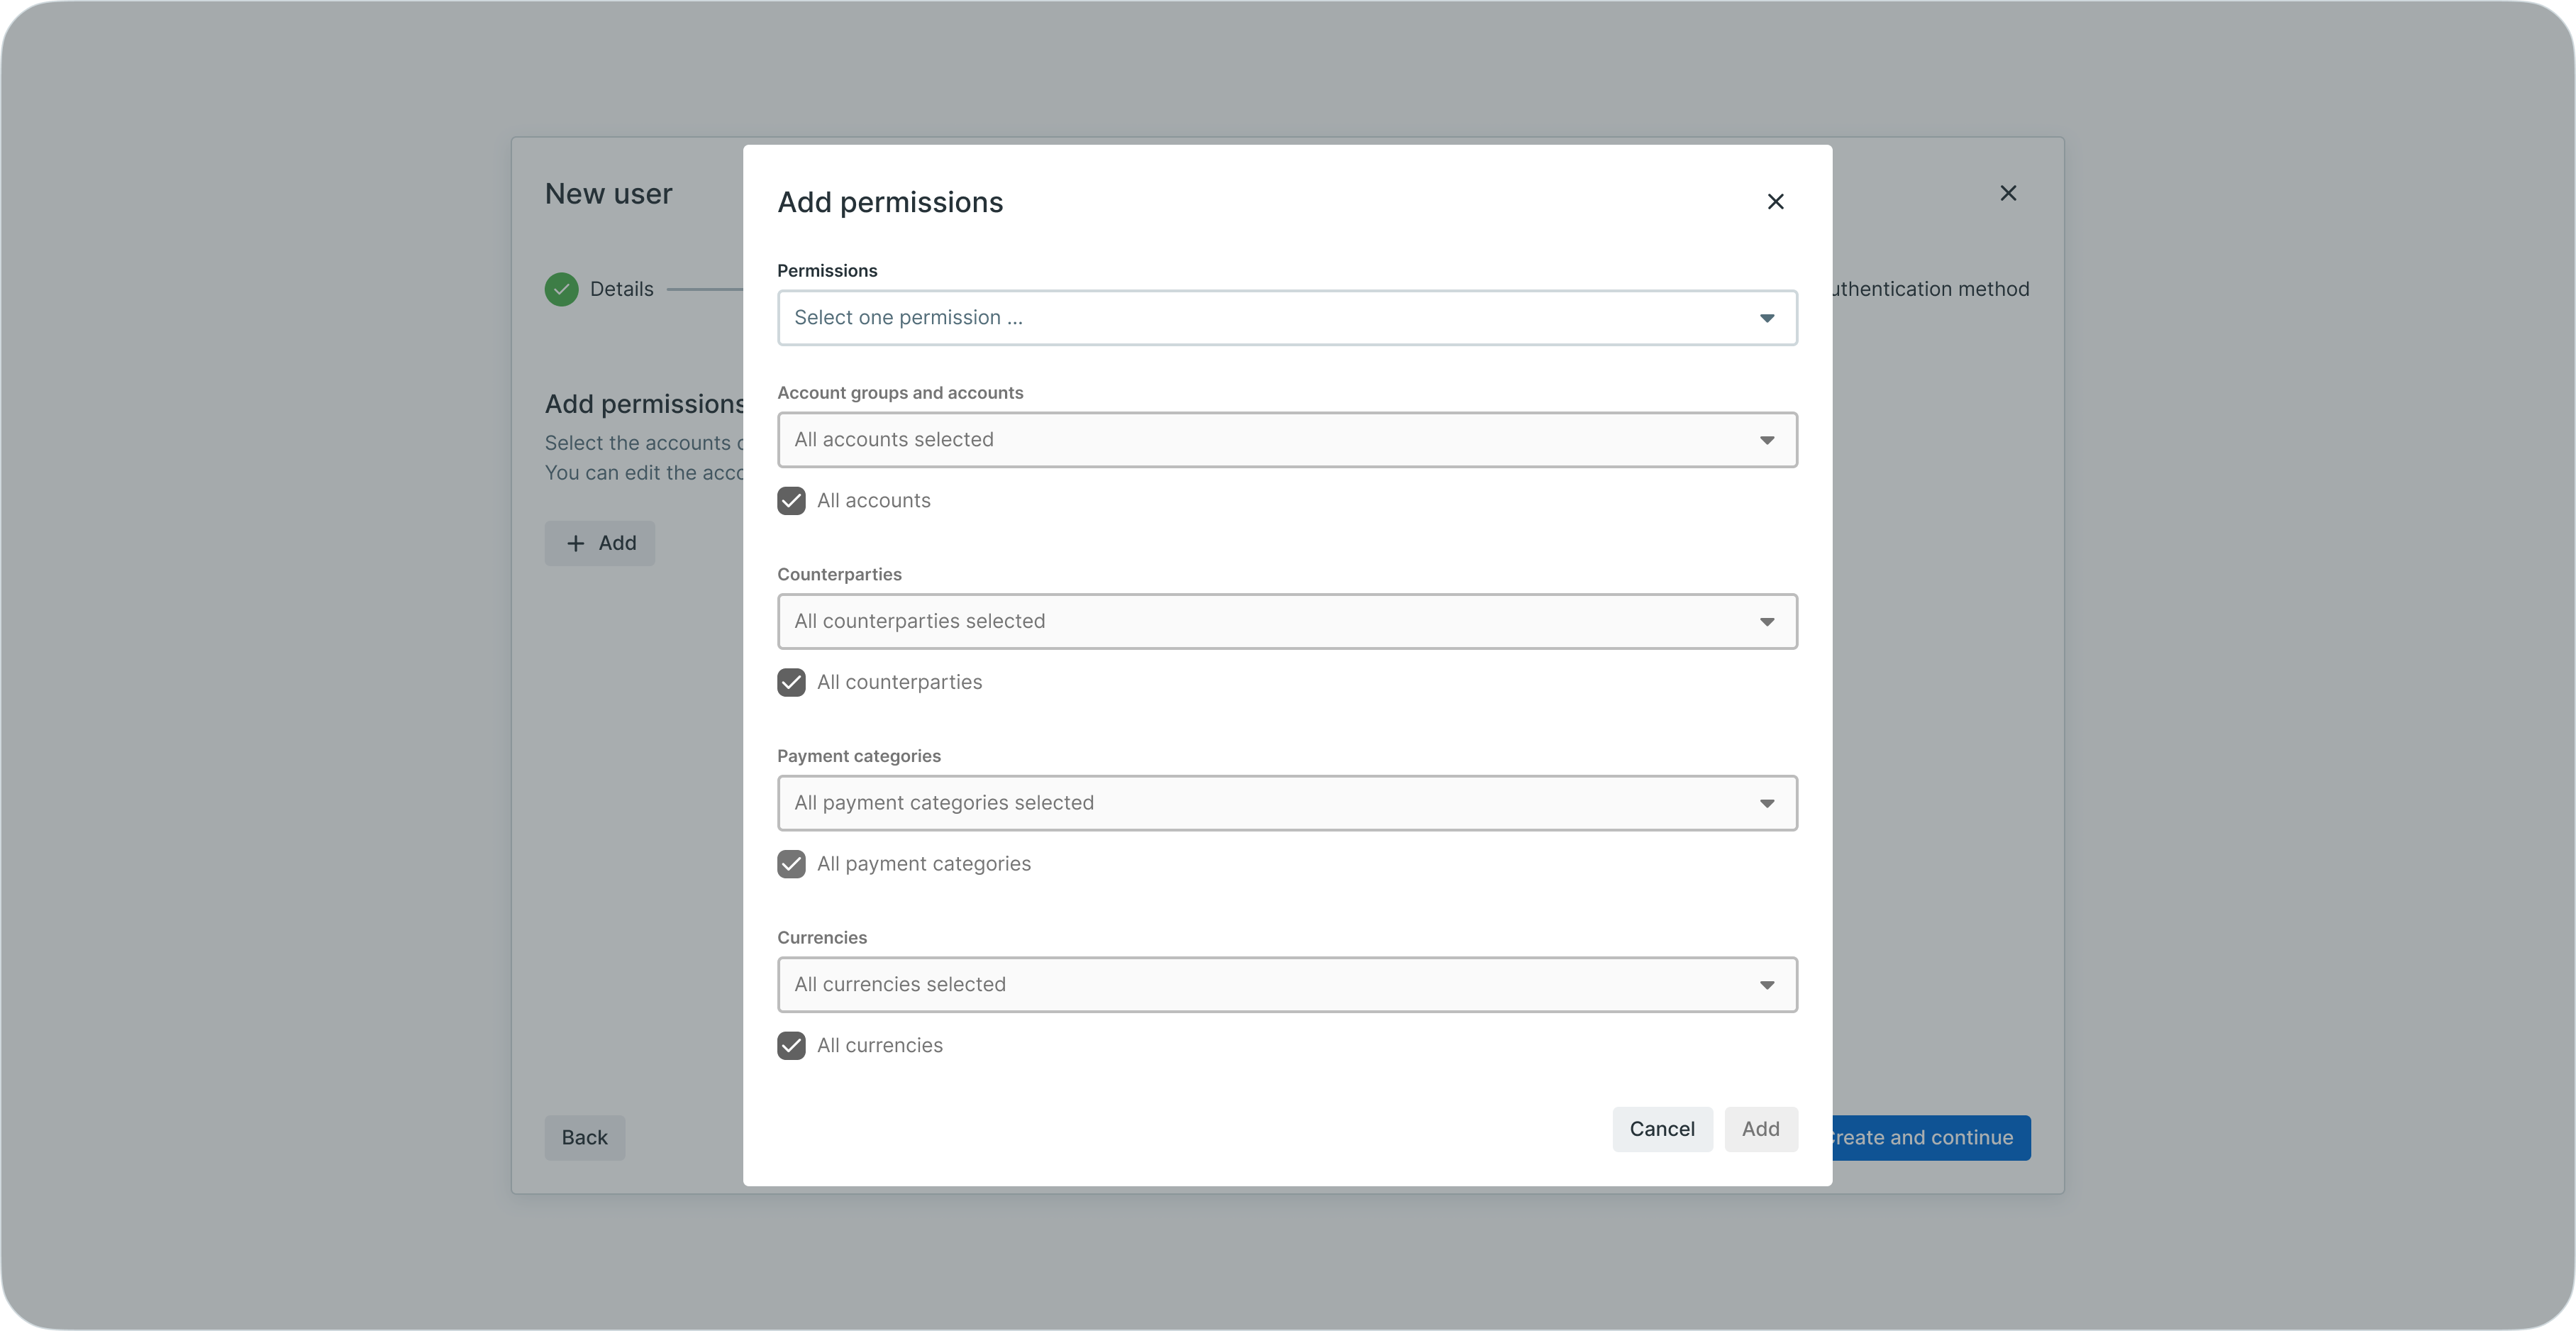
User creation step 3 showing access and permissions configuration
Define permissions across multiple dimensions:
- Permissions - Select from predefined roles with descriptions of allowed actions, or assign granular individual permissions
- Account groups and accounts - Specify which accounts the user can access and perform operations on
- Counterparties - Control which counterparties the user can view and use in payments
- Payment categories - Restrict payment creation and approval to specific categories
- Currencies - Limit transactions to specified currencies
Permission scoping ensures users only access relevant data and features for their role. For comprehensive permission concepts and RBAC framework, see Permissions - Comprehensive explanation of access control and role-based permissions.
Step 4: authentication method
Select the authentication method the user will use to log in and sign transactions.

User creation step 4 for configuring authentication method
Available authentication methods include:
- LYNKS Mobile App - Mobile authentication with biometric support and push notifications
- LuxTrust - Digital certificate authentication with qualified electronic signatures
- Single Sign-On (SSO) - Enterprise identity provider integration via OAuth2 or SAMLv2
For detailed information about authentication methods and configuration, see Authentication Methods - Detailed setup and usage of SSO, LuxTrust, and mobile app authentication.
Account activation
Once user creation is complete, the user receives an automatic email to activate their account. The activation email contains instructions for setting up their chosen authentication method and accessing LYNKS for the first time.
User details
The user details screen provides comprehensive visibility into a user's complete configuration. Click on any user in the users list to access their details page.
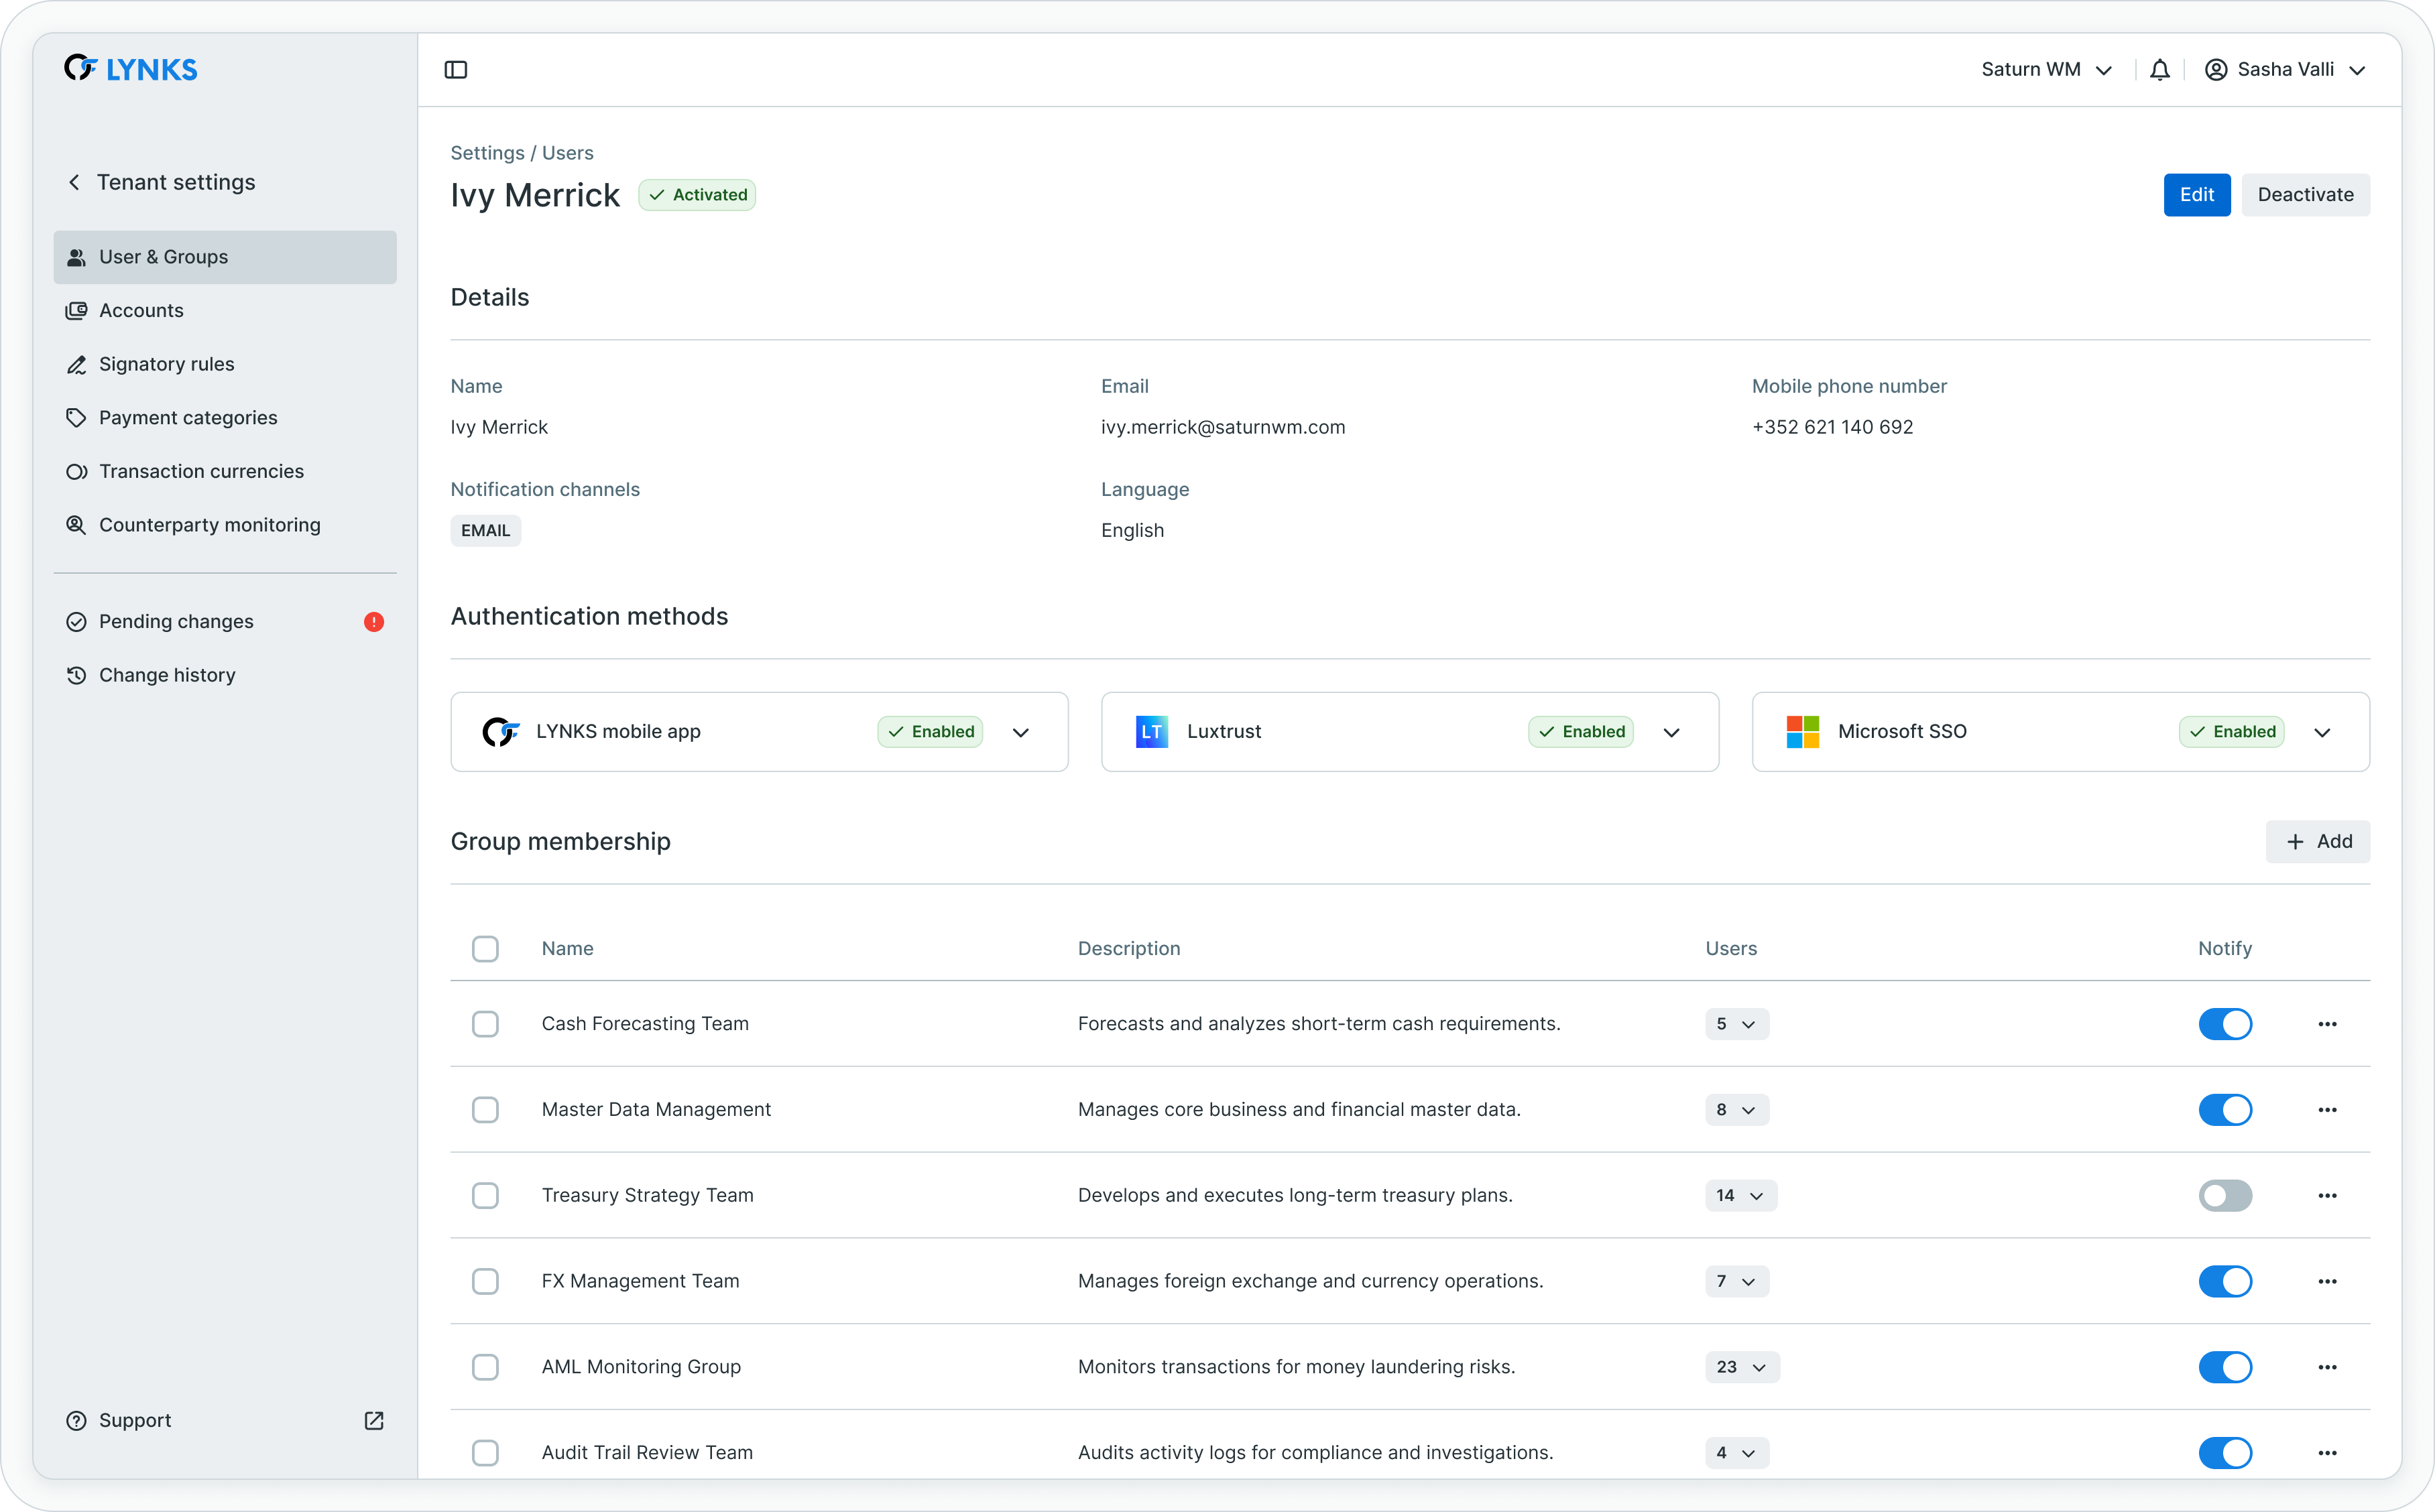
User details page showing personal information, authentication, and permissions
The details page is organized into several sections:
Personal information summary
At the top, a summary displays the user's name, email, status, and last login timestamp. An "Edit" button provides access to modify user configuration.
Authentication methods
The authentication methods section shows which authentication providers are enabled for this user. Administrators can add or remove authentication methods based on the user's needs and available authentication infrastructure.
For users requiring multiple authentication options or transitioning between authentication methods, multiple providers can be enabled simultaneously.
Access and permissions
This section provides detailed visibility into the user's granted permissions. Permissions are displayed with their scope, showing:
- Permission name - The specific right granted
- Scope parameters - Accounts, account groups, counterparties, payment categories, or currencies the permission applies to
- Granted via - Whether the permission was assigned directly to the user or inherited from group membership
When permissions are inherited through group membership, the source group is indicated, making it clear which permissions come from which source. This transparency helps administrators understand the effective permissions users have and identify permission sources when troubleshooting access issues.
Signatory groups
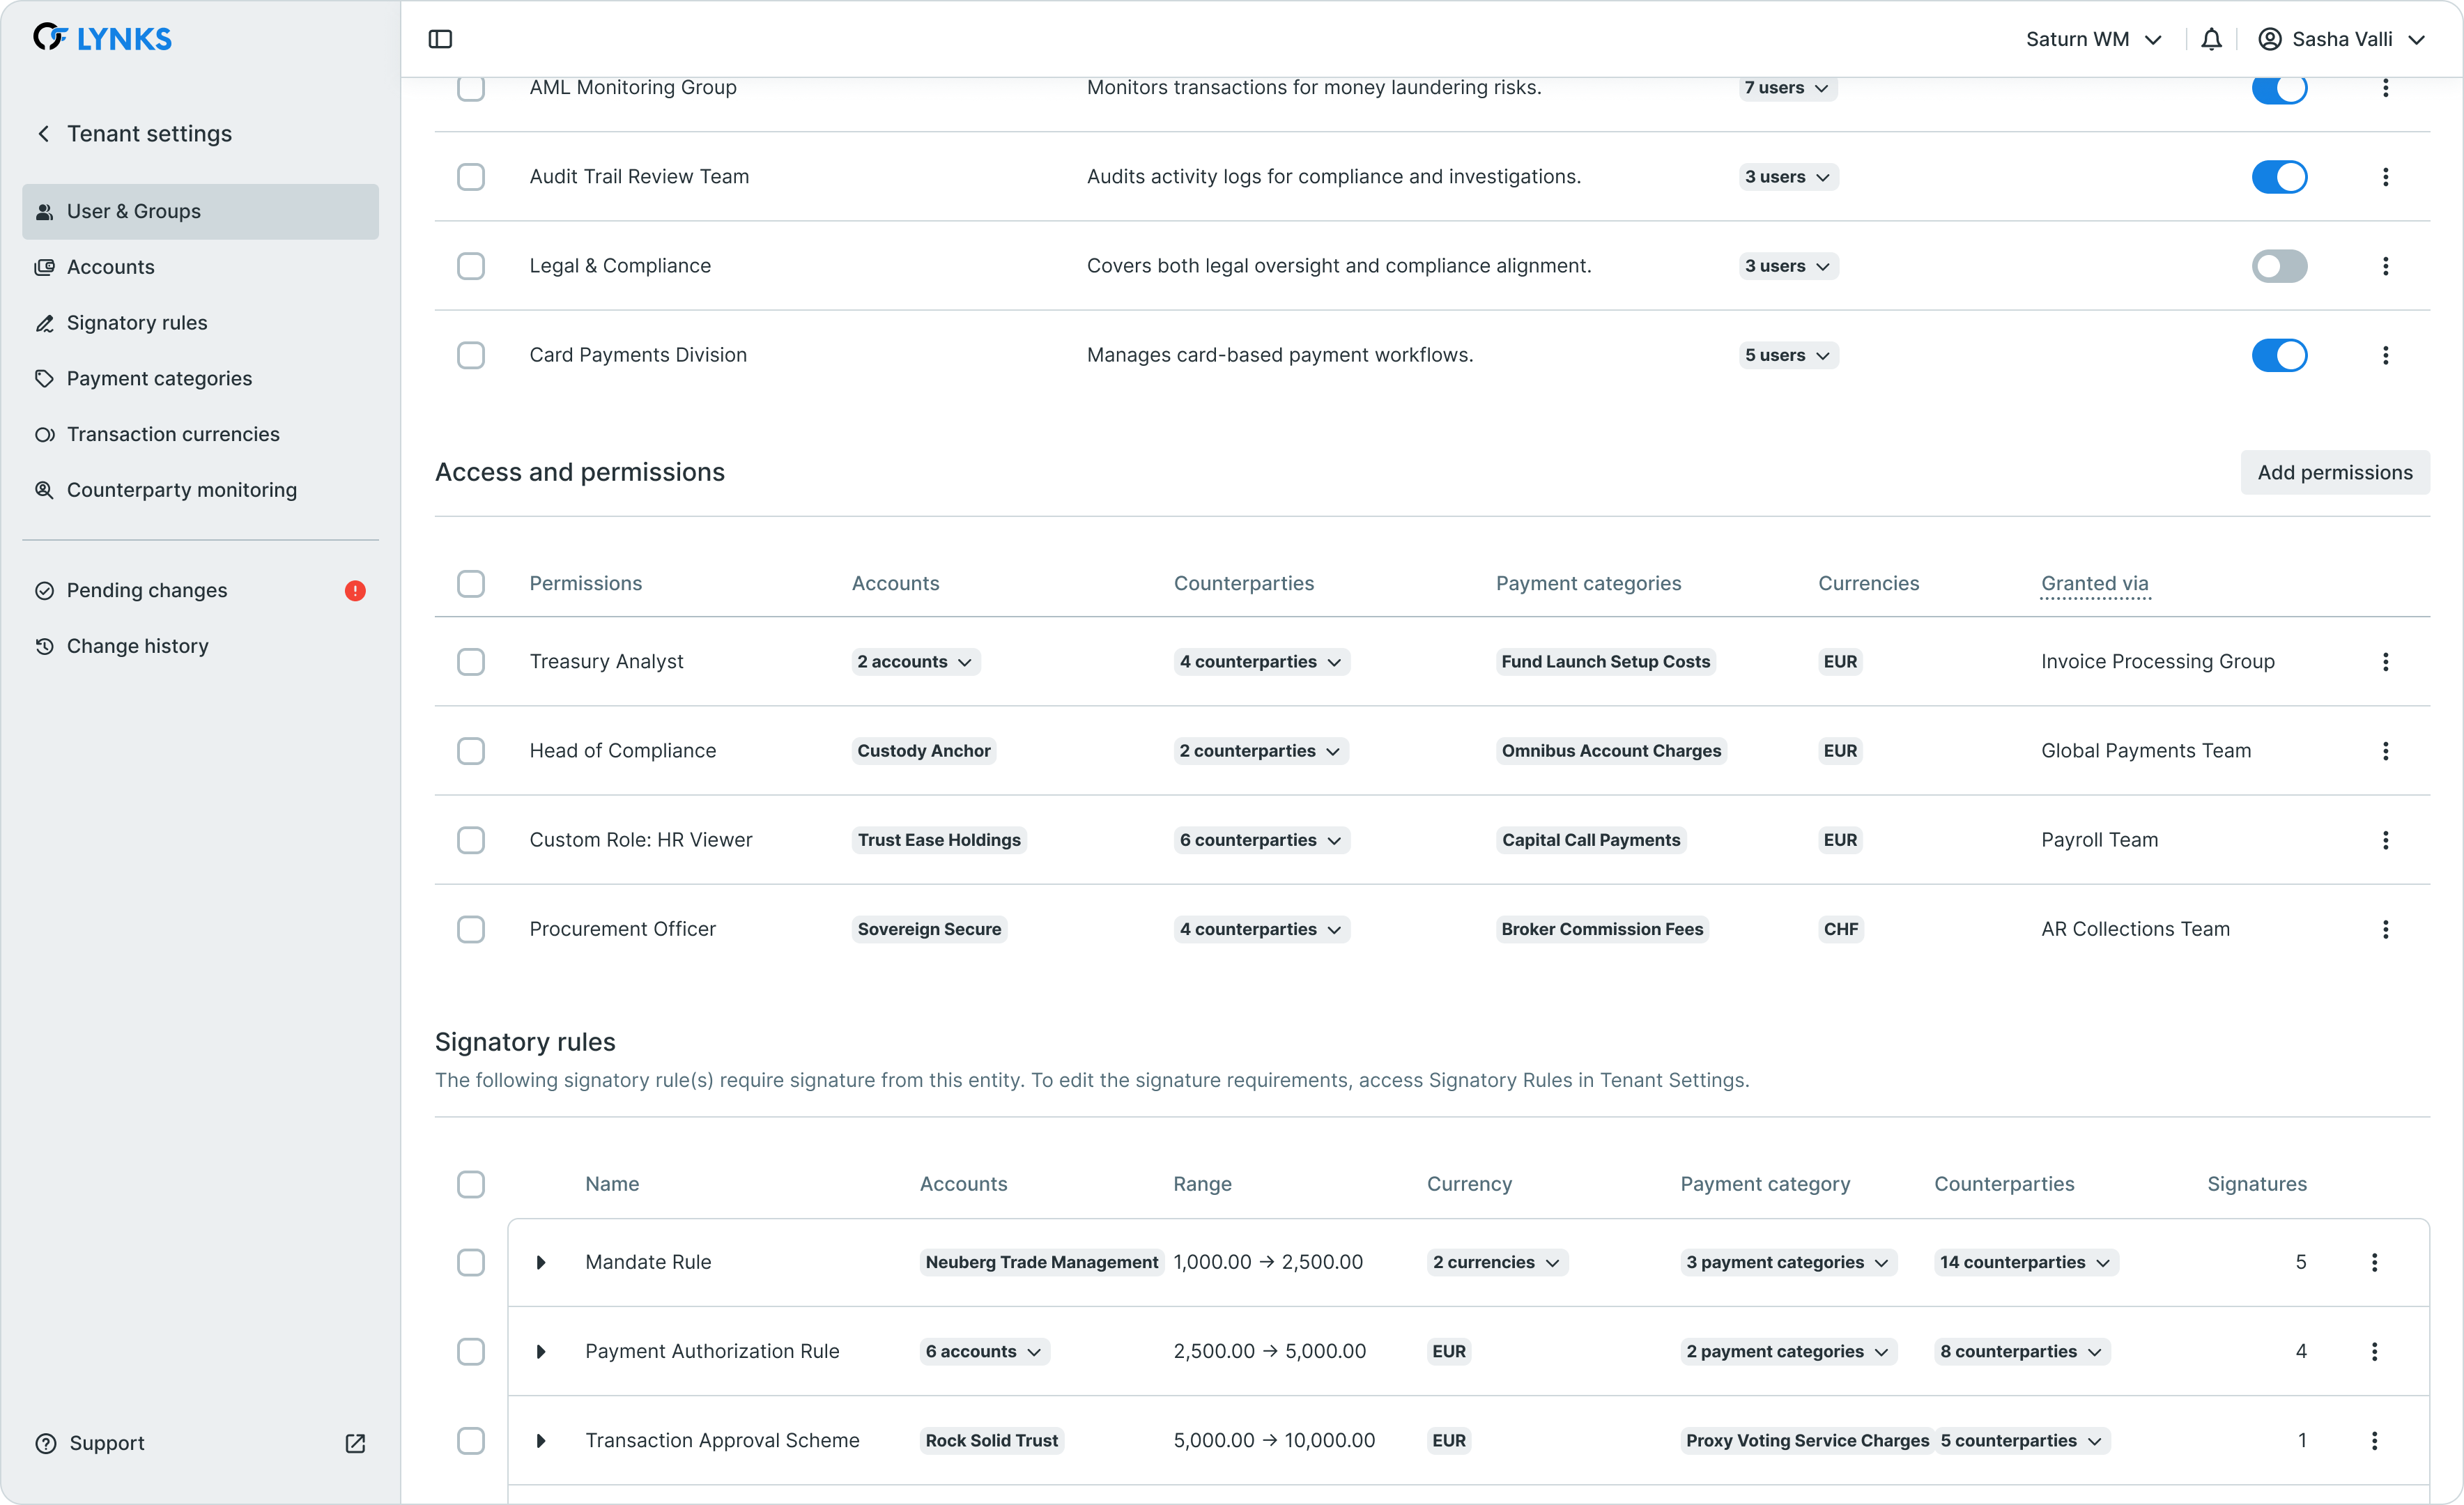
User details scrolled showing signatory groups and rules
The signatory groups section lists all groups where the user has signature authority. For each group, administrators can configure:
- Group membership - Add or remove the user from signatory groups
- Notification preferences - Enable or disable notifications when new payments require this user's signature
Signatory rules
Below the signatory groups, the signatory rules section displays detailed information about what the user can sign. This includes:
- Ordering party accounts - Which accounts the rules apply to
- Counterparties - Any counterparty restrictions
- Payment categories - Applicable payment types
- Currencies - Currency limitations
- Amount ranges - Minimum and maximum amounts the user can authorize
- Required signatures - Number of signatures needed from the group
This view mirrors the information available on the signatory rules page, providing context about approval requirements without requiring navigation to a separate section.
Audit log
The final section contains the complete audit log for the user, tracking every action and change made to the user account including:
- User creation and activation
- Permission additions and removals
- Group membership changes
- Authentication method modifications
- Status changes (activation, deactivation, reactivation)
- Configuration updates
Each audit entry records who made the change, when it occurred, and what was modified, providing complete traceability for compliance and security purposes.
Editing a user
User configurations can be updated at any time by administrators with appropriate permissions. Access the edit function either through the action menu (three dots) next to the user in the list, or by clicking "Edit" on the user details page.
Modifying permissions
Permissions can be adjusted by navigating to the user permissions section through adding, editing, or removing permissions:
Adding permissions: Select from available permission types and assign granular individual permissions with specific scope parameters (accounts, payment categories, currencies, counterparties).
Editing permissions: Click the edit button on an existing permission entry to modify the permission scope, parameter values, or access levels directly without deleting and recreating the permission. This streamlined approach reduces configuration errors and administrative overhead.
Removing permissions: Delete permissions that are no longer needed using the remove action.
For users who are members of groups, remember that they inherit permissions from those groups. The "Granted via" indicator shows whether each permission is direct or inherited. When more expansive permissions exist at both user and group levels, the broader permission scope applies.
Managing group membership
User group memberships can be modified from the user details page. Click "Add to groups" in the group membership section to assign the user to additional groups, or use the action menu to remove existing group memberships.
Group memberships can also be managed from the user groups interface, providing flexibility in how you organize users and permissions.
Changing authentication methods
Authentication methods can be enabled or disabled for users outside the standard editor workflow. Authentication method changes may follow different approval processes depending on the method selected and your tenant's security configuration.
Deactivating a user
To deactivate a user, use the action menu or click "Deactivate" in the user details page. Deactivation immediately prevents the user from logging in and performing any actions in LYNKS.
Once a user deactivation is approved (if tenant settings approval is enabled), the user can still be reactivated later if needed. Reactivation requires approval before the user regains access.
User groups list
The user groups list provides an overview of all configured groups within your tenant. Groups enable efficient permission management by allowing batch assignment of rights to multiple users.
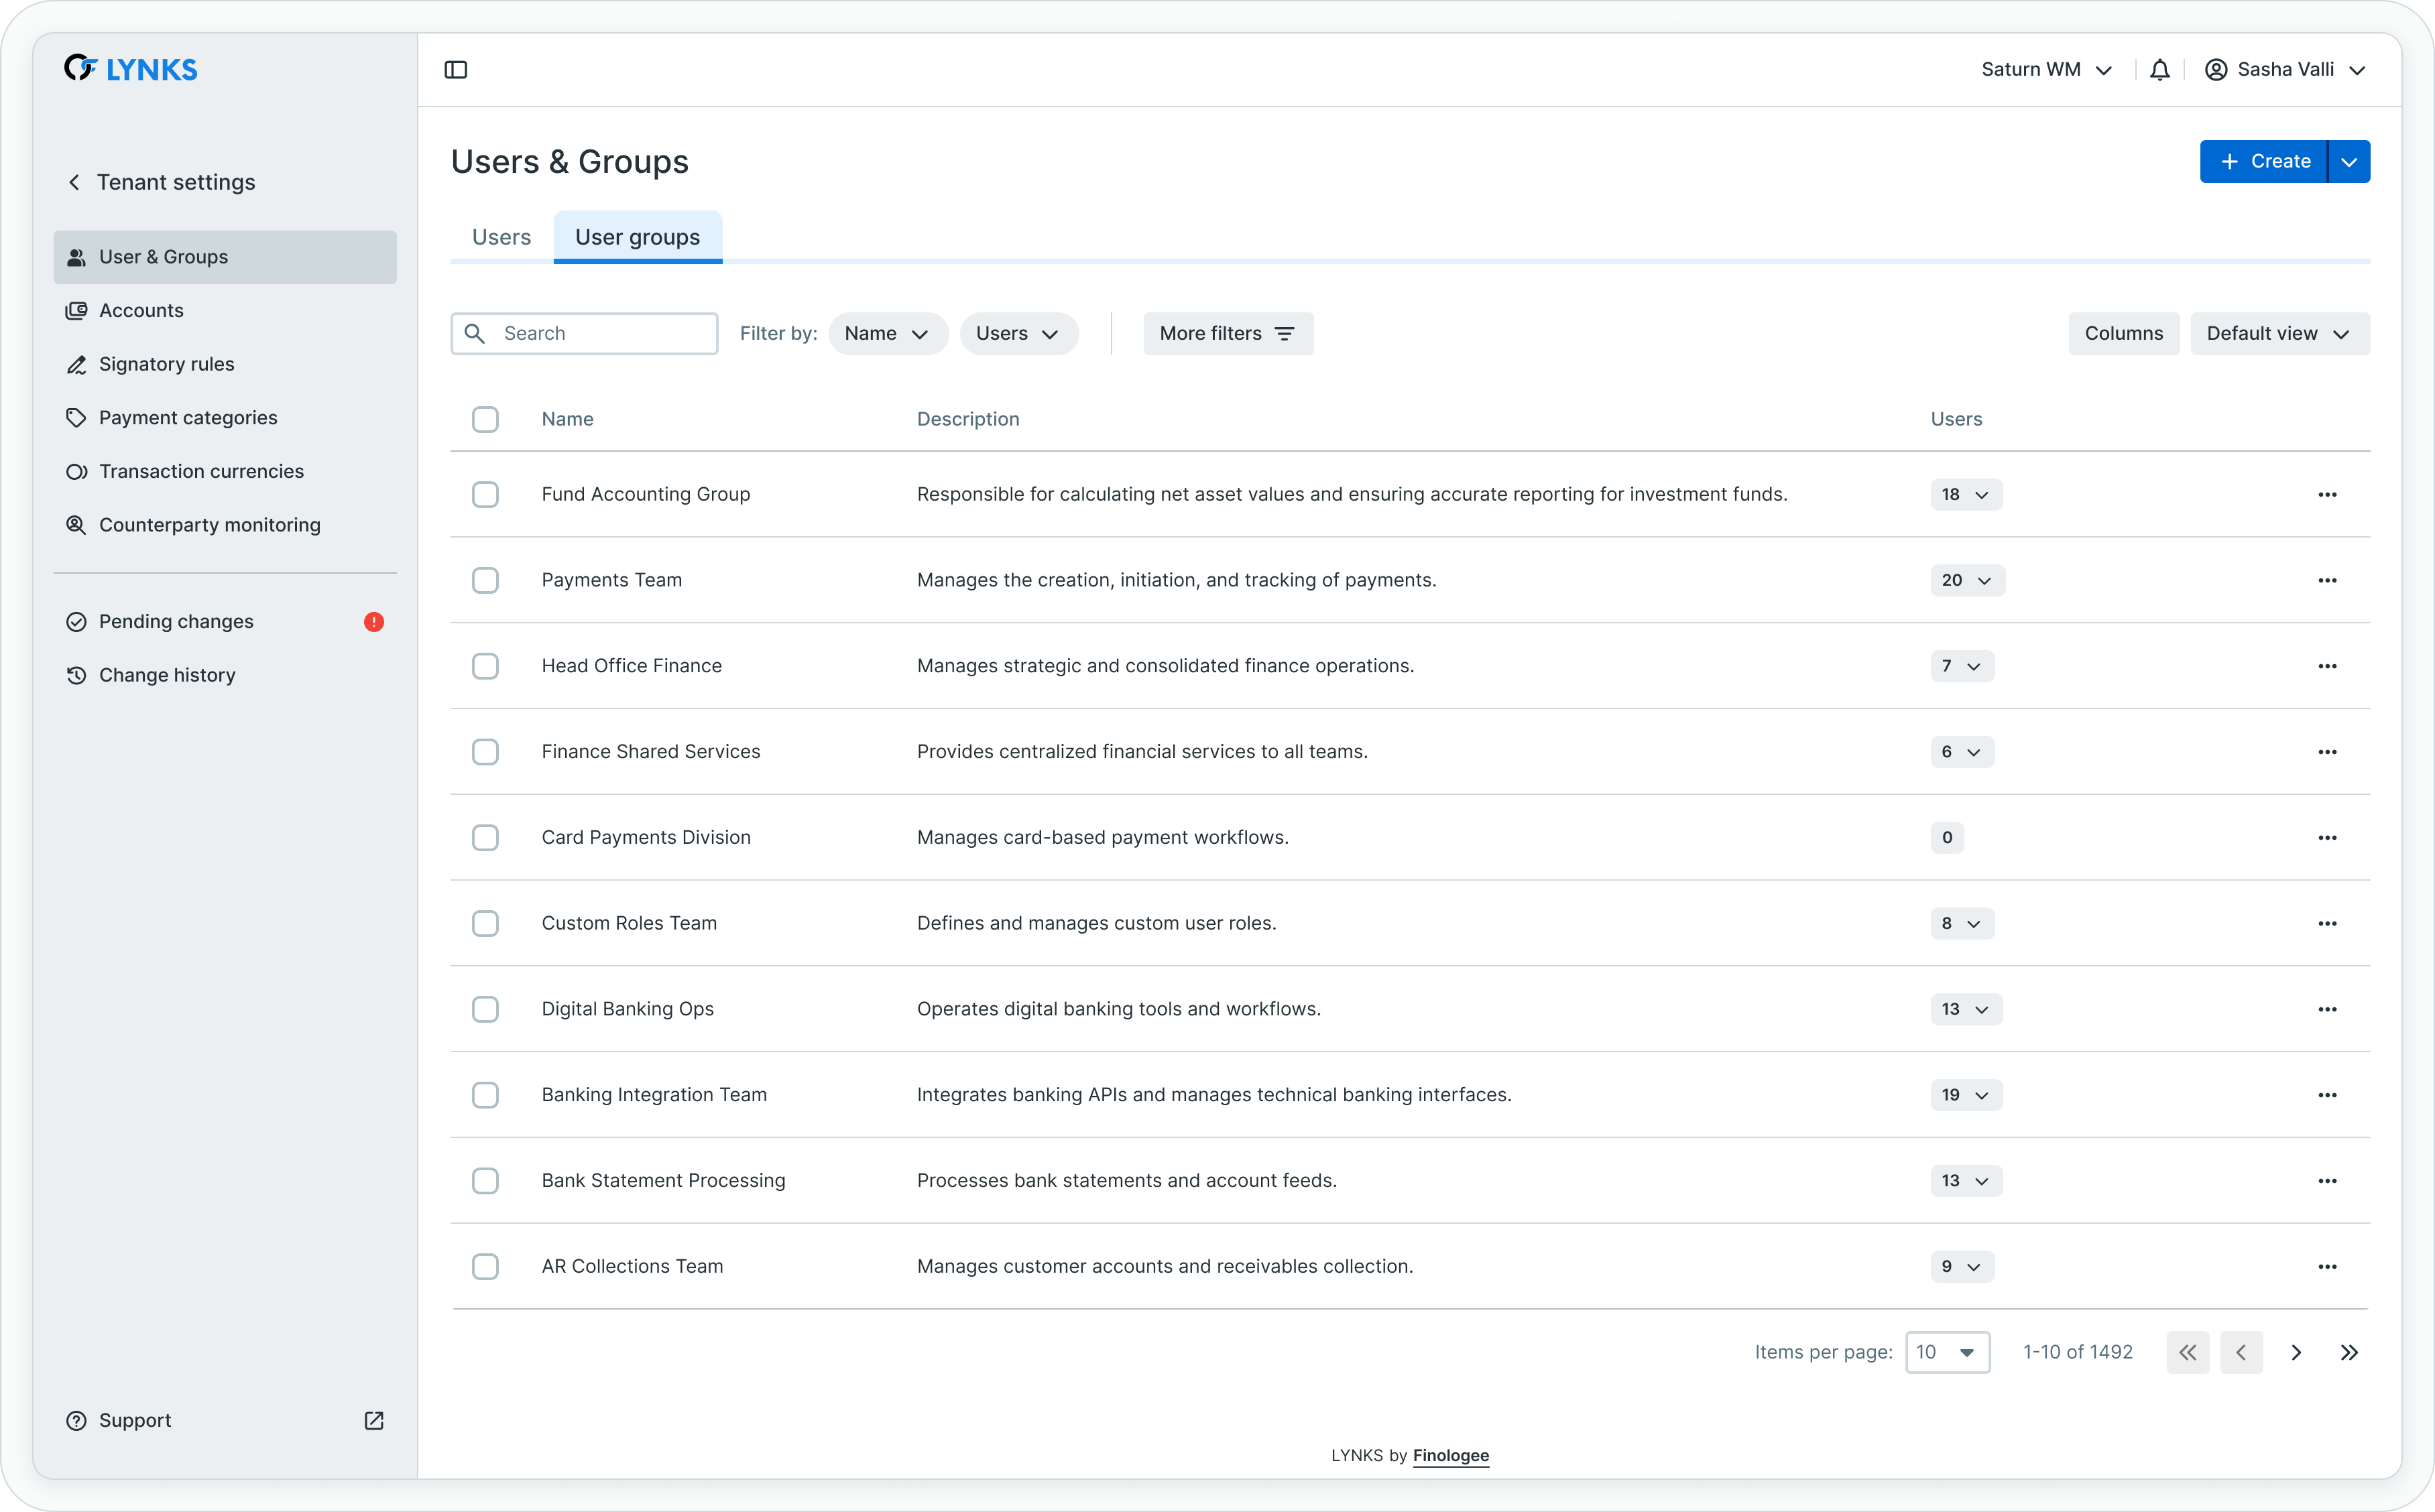
User groups list showing group names, descriptions, and member counts
Each group entry displays:
- Group name - Identifier for the group
- Description - Brief explanation of the group's purpose or role
- Number of users - Count of members in the group
- Members list - Names of users belonging to the group
Groups are particularly valuable for organizations with multiple users sharing similar responsibilities, as permissions assigned to the group automatically apply to all members.
User group details
The user group details page provides complete visibility into group configuration and inherited permissions. Click on any group in the groups list to access its details.
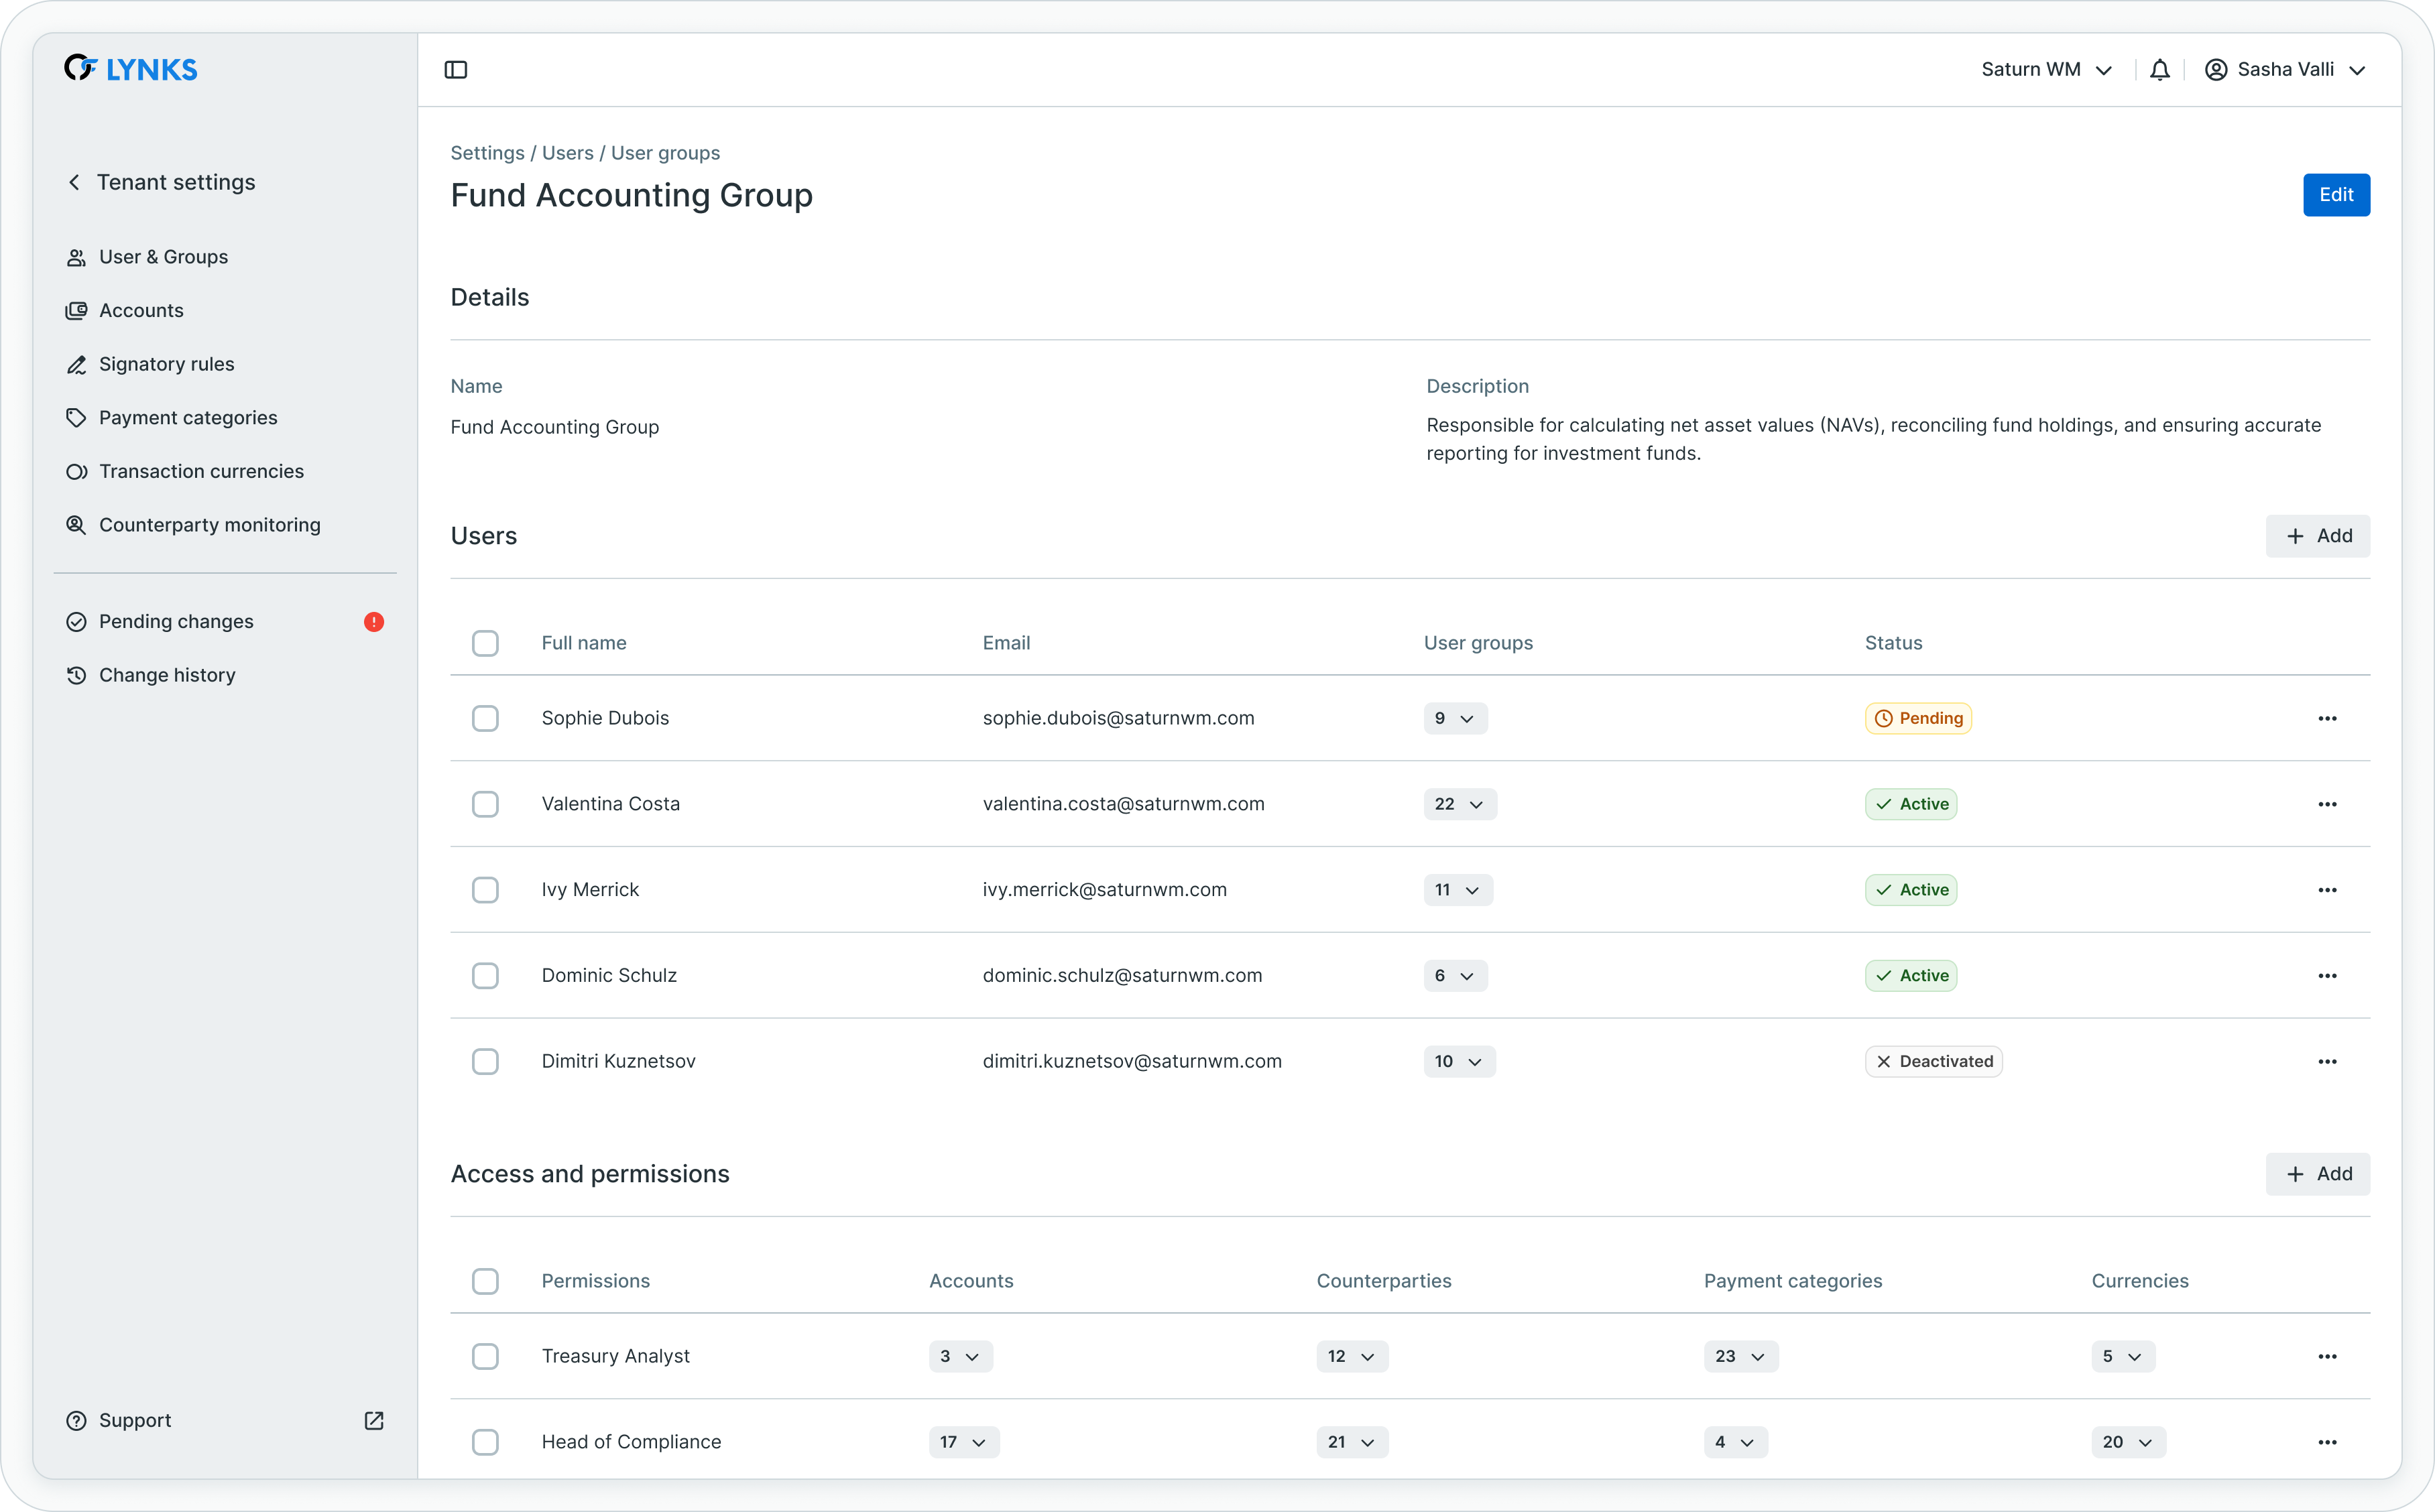
User group details showing name, members, and permissions
The details page is structured as follows:
Group information
The top section displays the group name and description. Administrators can edit these fields to maintain clear group identification and documentation.
Group members
The members section lists all users belonging to the group. Administrators can:
- Add members - Assign additional users to the group
- Remove members - Remove users from the group
- Configure notifications - Enable or disable signature notifications for each member
Notifications are managed at the group level and apply to all payments that require signatures from this group. Individual users can have notifications enabled or disabled based on their role and preferences.
Access and permissions
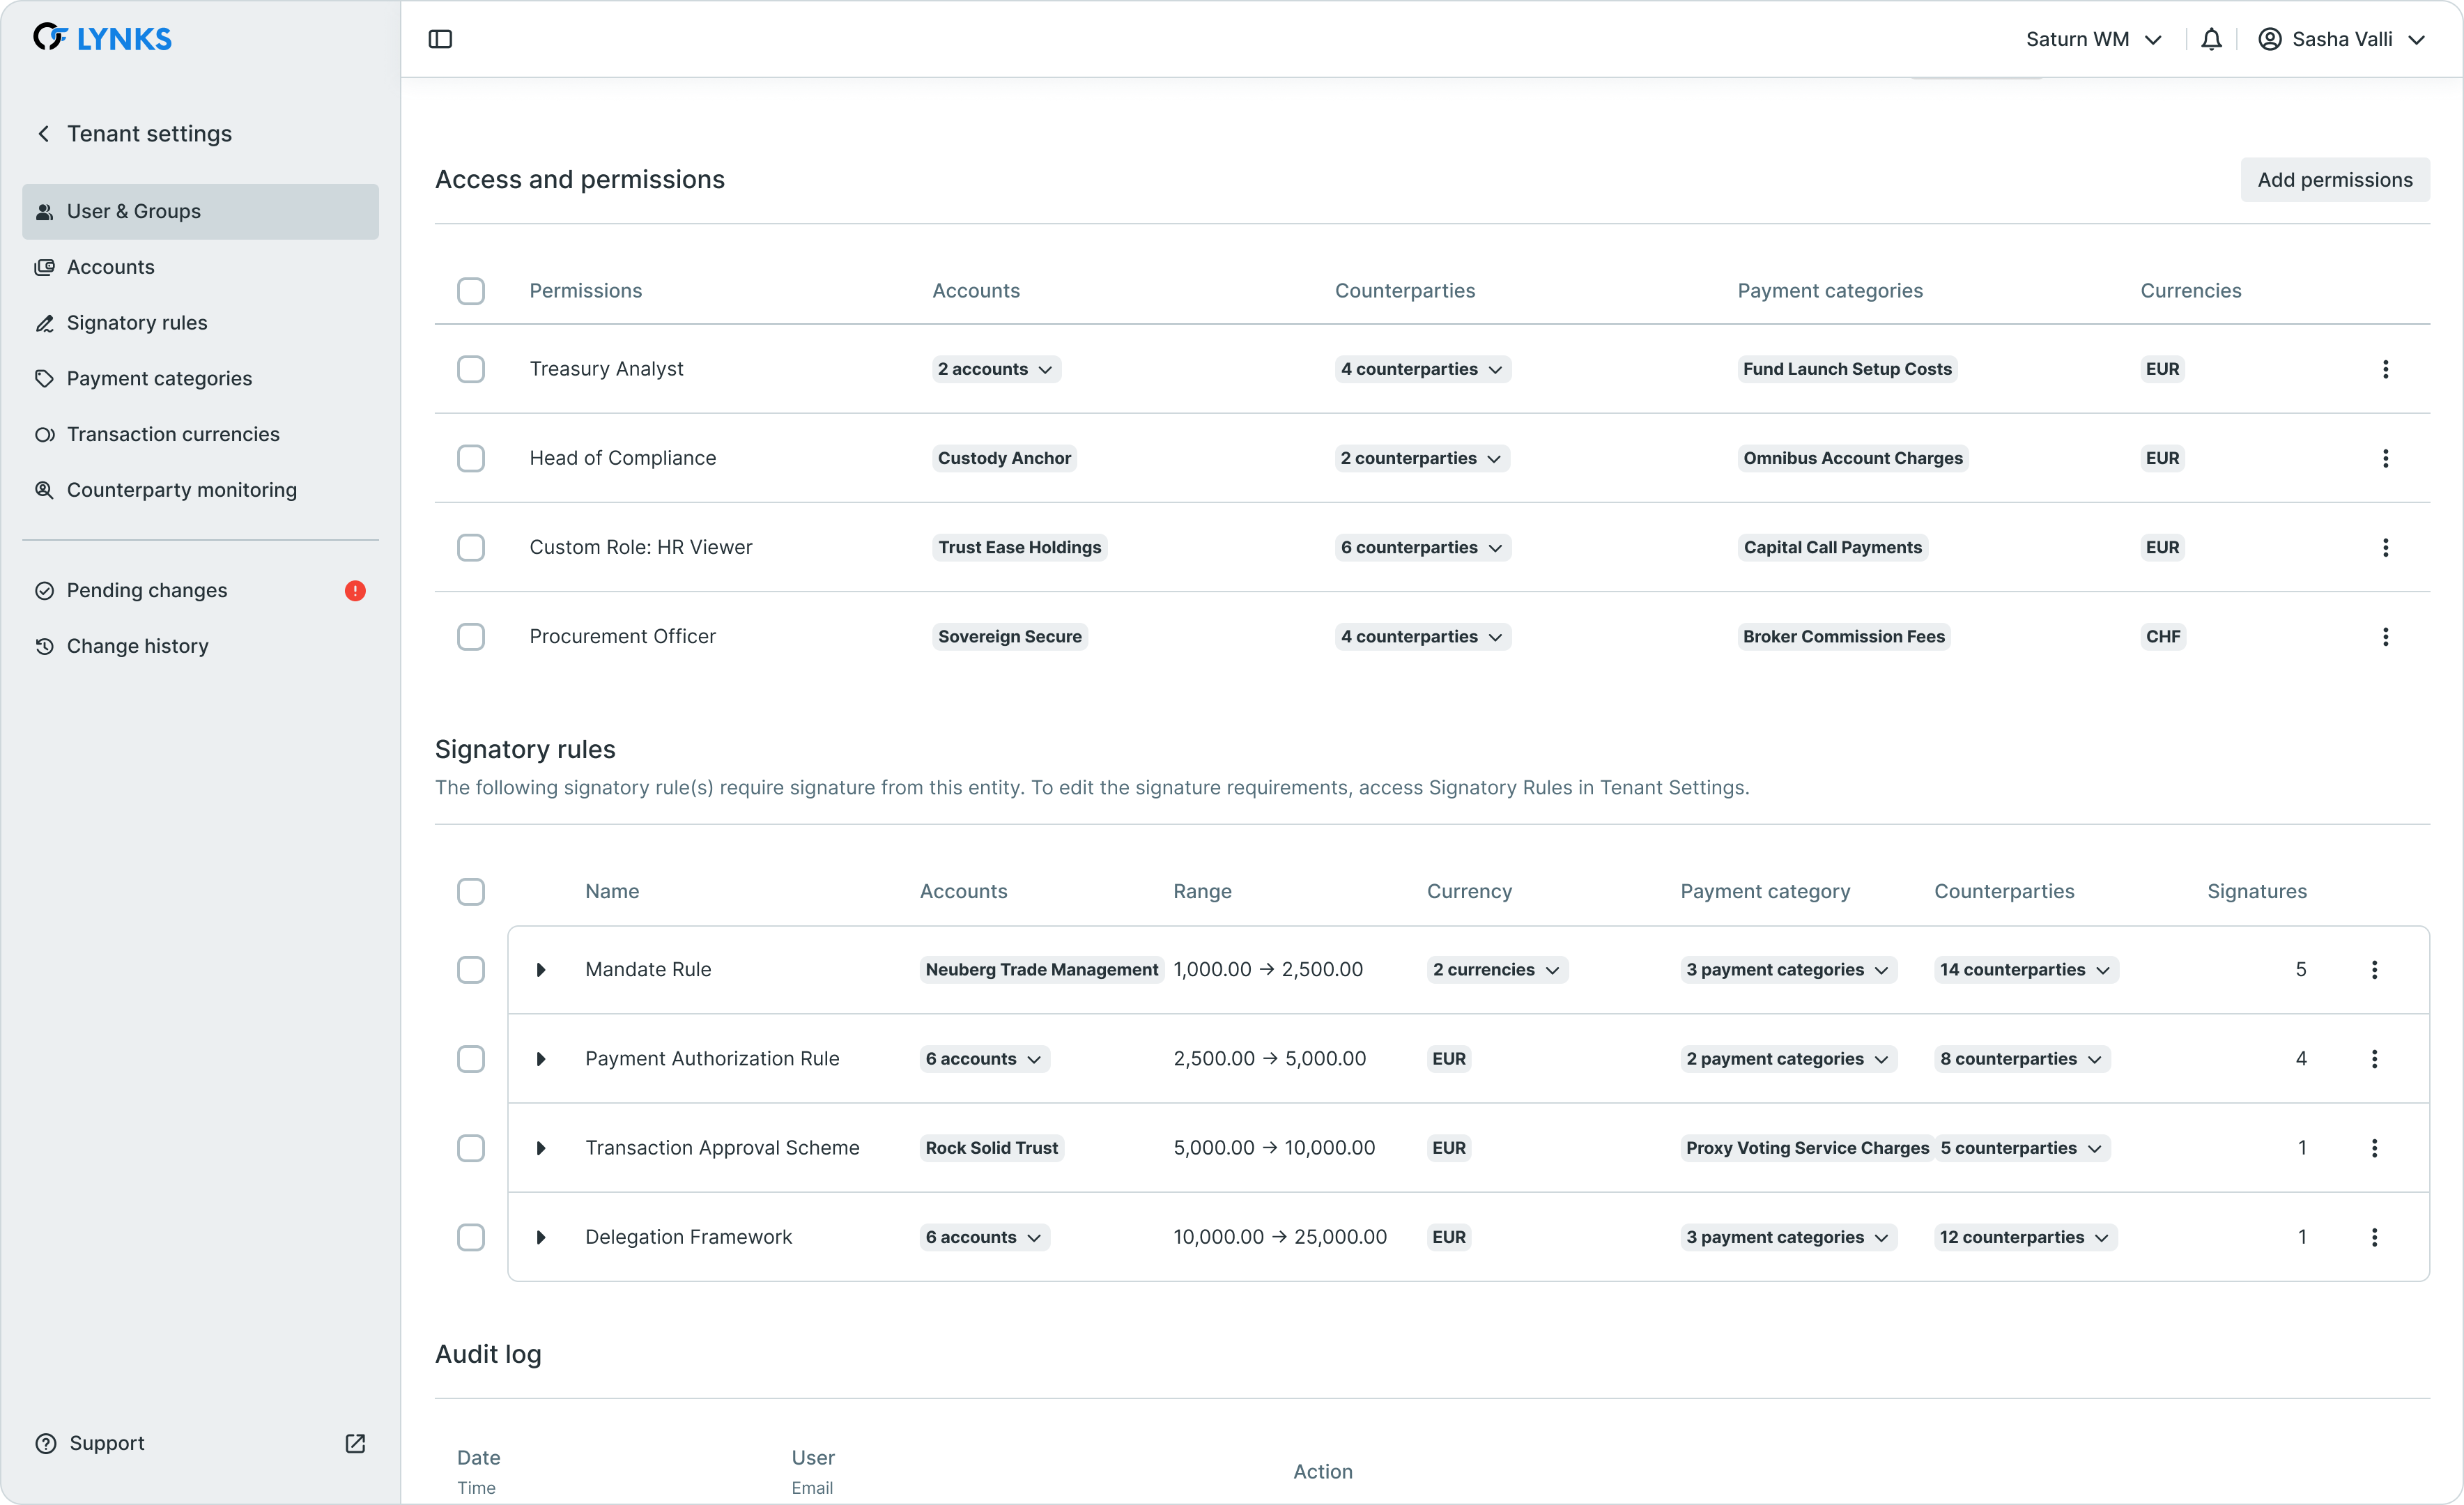
User group details scrolled showing signatory rules and audit log
Permissions assigned at the group level are automatically inherited by all members. This centralized permission management reduces configuration complexity and ensures consistent access rights across team members.
Administrators can manage group permissions through:
- Adding permissions - Assign new permissions to the group with appropriate scope parameters
- Editing permissions - Modify existing permission entries directly to adjust scope, parameter values, or access levels without recreating the permission
- Removing permissions - Delete permissions no longer needed by the group
When users belong to multiple groups, they inherit the combined permissions from all groups. Where permission scopes overlap, the most expansive scope applies.
Signatory rules
An expandable section displays all signatory rules associated with the group, showing the same information available on the signatory rules configuration page. This view allows administrators to understand what group members can authorize without navigating away from the group context.
Audit log
The final section contains the complete history of changes made to the group, tracking group creation, member additions and removals, permission changes, and configuration updates with full attribution and timestamps.
User profile report
Administrators can download a comprehensive snapshot of all configured user profiles for documentation, audit, and review purposes. Click "Download user profiles" in the top right corner of the users page to generate the report.
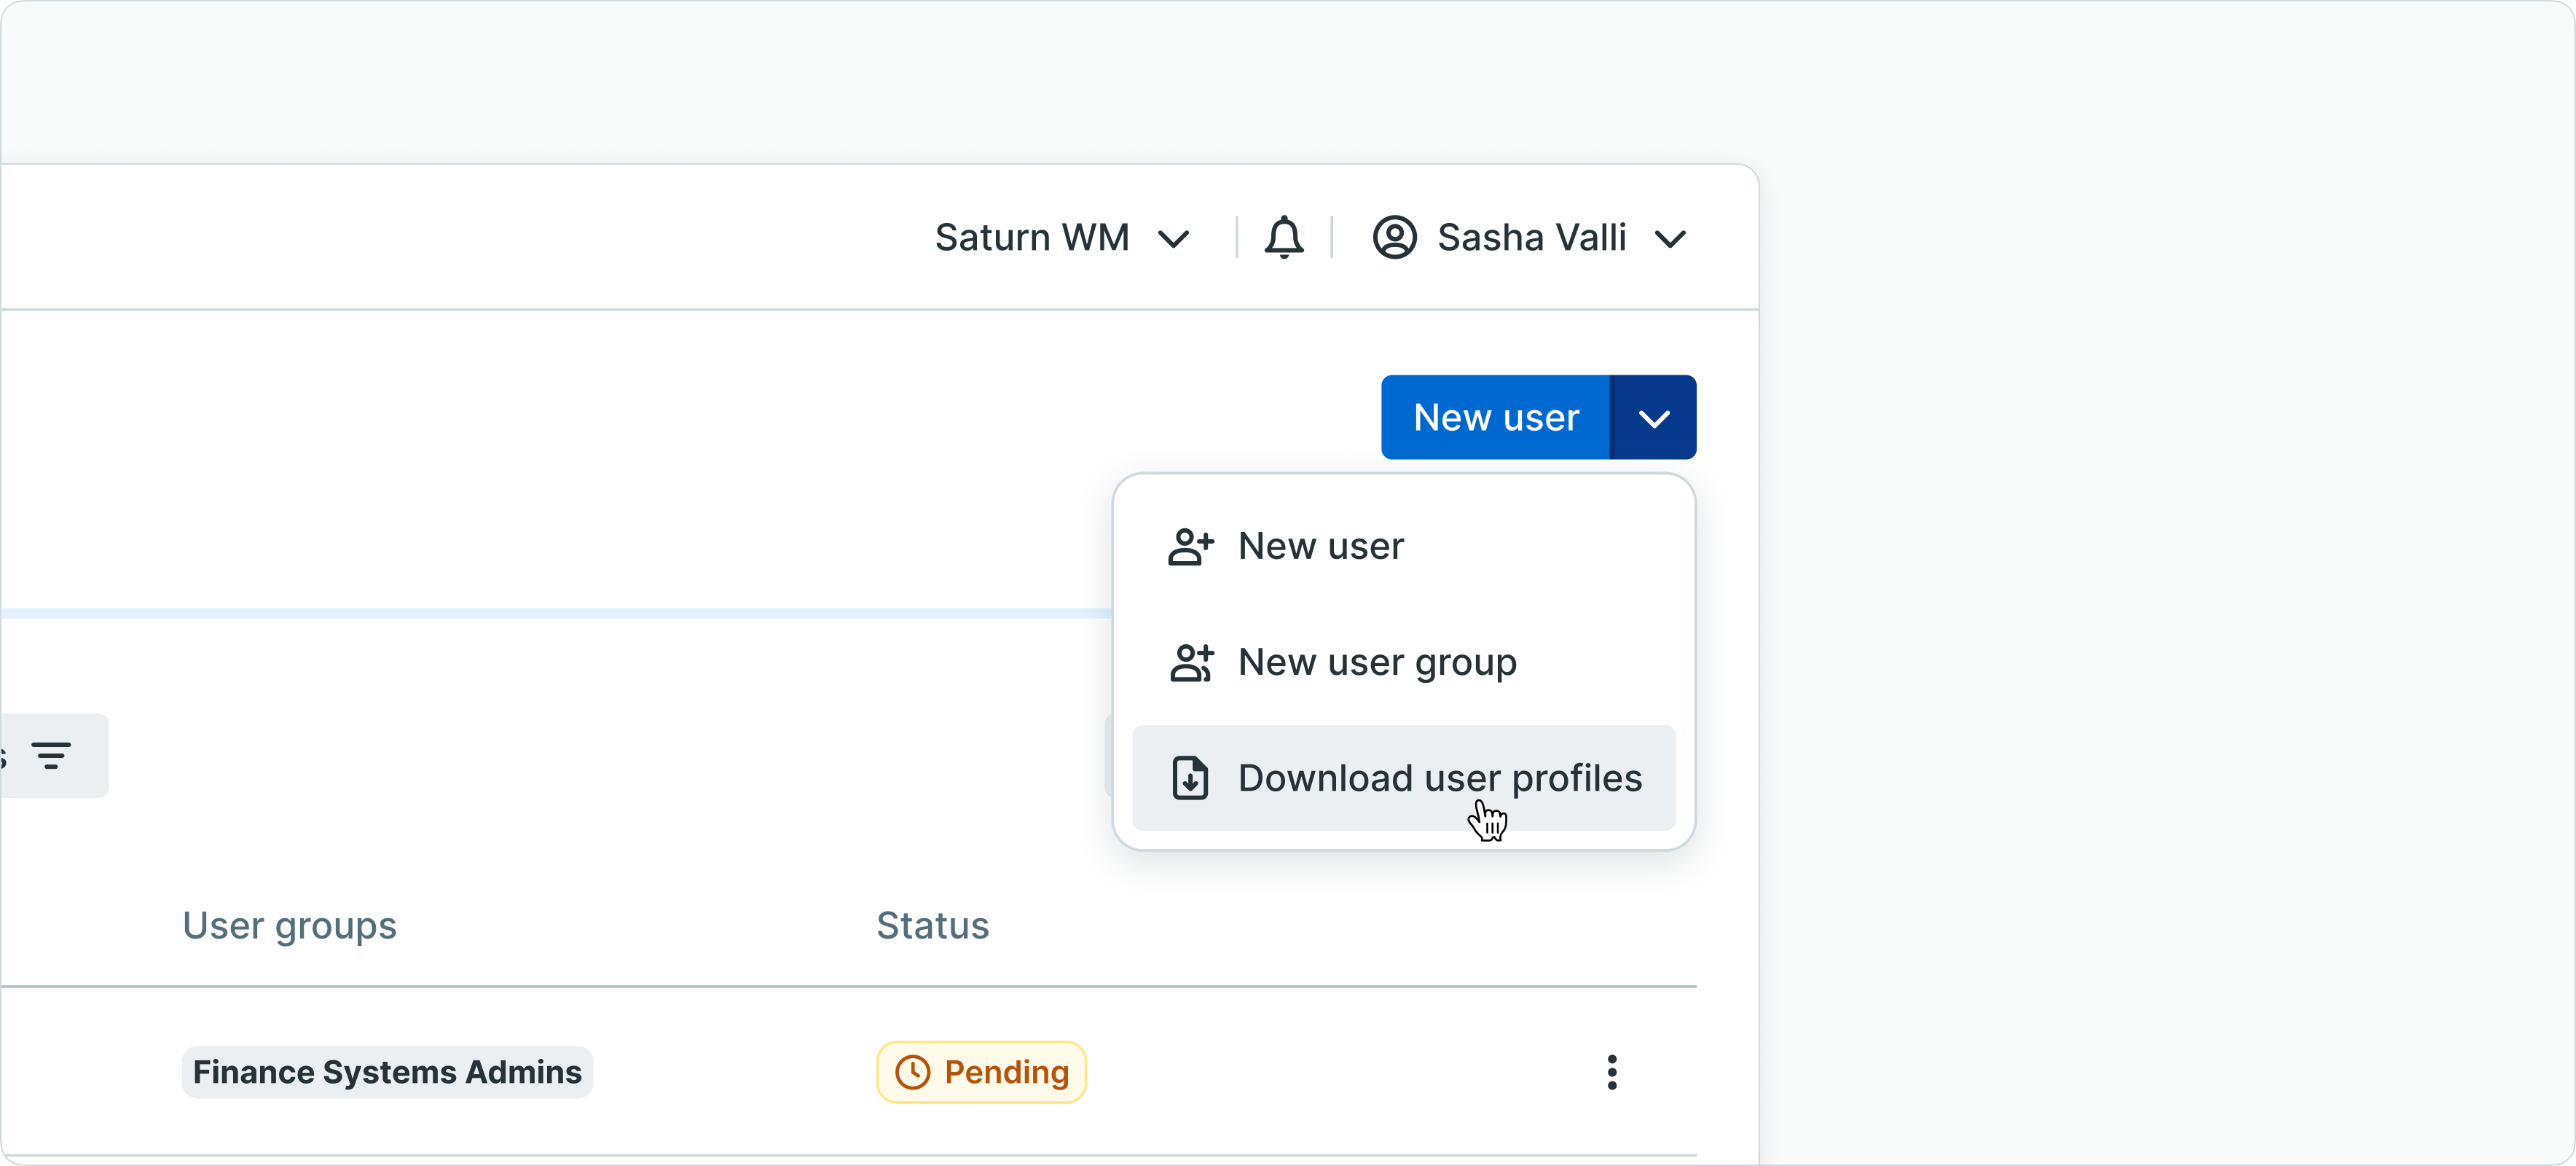
Download user profiles button location
The report is generated as an Excel file containing two major sections:
Access and permissions report
This tab documents all permissions granted to users, showing:
- User identification - Name and email
- Permission details - Specific rights granted to each user
- Scope parameters - Account groups, accounts, payment categories, and currencies
- Creation date - When the user was created
- Last login - Most recent authentication timestamp
- Last modified - Date and user who made the most recent change
This comprehensive view enables permission audits and reviews to ensure appropriate access control.
Signatory matrix report
This tab provides a complete overview of signatory groups and their members:
- Ordering parties - Accounts covered by the rules
- Account numbers - Specific account identifiers
- Payment categories - Applicable payment types
- Currencies - Currency restrictions
- Amount limitations - From and to amounts defining authorization ranges
- Required signatures - Number of signatures needed per group
- Group members - Users who can sign for the group
- Notification status - Whether each member receives signature request notifications
This matrix is valuable for compliance documentation, audit trails, and verification that approval workflows are properly configured.
Automated user management via SCIM 2.0
LYNKS supports automated user provisioning using the System for Cross-domain Identity Management (SCIM) protocol version 2.0. This integration enables organizations to manage users centrally from their identity provider, automatically synchronizing user accounts and groups with LYNKS.
User provisioning concepts
User provisioning automates user lifecycle management by:
- Automatic user creation - New users added to the identity provider are automatically created in LYNKS
- User updates - Changes to user details in the identity provider sync to LYNKS
- User deactivation - Users removed from the identity provider are deactivated in LYNKS
- Group synchronization - User group memberships are maintained automatically
Benefits of SCIM integration
Automated provisioning provides several advantages:
- Centralized management - Single source of truth for user identities
- Reduced administrative burden - No manual user creation or maintenance
- Improved security - Automatic deactivation when users leave the organization
- Consistent access control - Role-based permissions defined once and applied automatically
- Audit compliance - Complete tracking of user provisioning actions
Role and permission based access control
Organizations can classify users by role and department through group membership in their identity provider. Creating groups with defined permissions allows granular role-based access controls that automatically apply when users are provisioned to LYNKS.
Users can be assigned to multiple groups, inheriting the combined permissions from all group memberships. This flexible approach supports complex organizational structures and varied access requirements.
Supported identity providers
LYNKS supports SCIM integration with leading identity providers:
- Microsoft Azure AD / Entra ID - Enterprise directory service
- Okta - Cloud-based identity management platform
Provisioned user restrictions
Users provisioned via SCIM have certain management restrictions because their authoritative source is the external identity provider:
- Personal details - Name, email, and contact information cannot be modified in LYNKS
- Group membership management - Cannot be added to or removed from groups within LYNKS (managed via identity provider)
- User lifecycle - Activation and deactivation controlled by identity provider
These restrictions ensure data consistency between the identity provider and LYNKS.
Permission management for provisioned users
While core identity attributes are locked, access and permissions can still be managed within LYNKS:
- Group-level permissions - Assign permissions to provisioned groups (recommended approach)
- User-level permissions - Add additional permissions directly to individual provisioned users
- Signatory groups - Add provisioned users to signatory groups for approval workflows
For more information about SCIM configuration and setup, contact [email protected].
multi-tenant user access
LYNKS supports users who require access to multiple tenants (organizations). This is common for service providers, consultants, fund administrators, and holding company personnel who work with several client organizations.
When a user has access to multiple tenants:
- Separate permissions per tenant - Each tenant can configure different permission levels for the user
- Tenant switching - Users switch between tenants using the tenant switcher in the sidebar navigation
- Independent contexts - Each tenant maintains complete data isolation; the user only sees data for the currently selected tenant
- Separate configurations - Authentication methods, group memberships, and permissions are tenant-specific
To configure multi-tenant access for a user, the user must be created in each tenant where access is required, with appropriate permissions configured for each tenant independently.
For more information about multi-tenancy and tenant isolation, see Tenants & Multi-tenancy - Understanding tenant isolation, data separation, and multi-tenant access.
Best practices
Follow these recommendations for effective user and group management:
Group-based permission management
Assign permissions to groups rather than individual users whenever possible. This approach:
- Simplifies permission management as organizations scale
- Ensures consistency across users with similar roles
- Reduces configuration errors
- Streamlines onboarding for new team members
Principle of least privilege
Grant users only the permissions necessary to perform their job functions. Avoid granting broad administrative access unless required for the user's role.
Regular permission reviews
Periodically review user permissions and group memberships to ensure they remain appropriate:
- Use the user profile report to audit current permissions
- Verify users removed from roles have corresponding permission revocations
- Check for unused or inactive accounts that should be deactivated
Documentation and naming conventions
Maintain clear descriptions for user groups explaining their purpose and intended permissions. Use consistent naming conventions that make group functions obvious to administrators.
Leverage SCIM for large organizations
Organizations with more than 10 users should consider implementing SCIM provisioning to automate user lifecycle management and reduce administrative overhead.
Separate signatory groups from access groups
Consider using different groups for signatory authority and general access permissions. This separation provides finer control over who can view data versus who can approve transactions.
Related documentation
Explore these related sections to learn more about user management and access control:
Core Concepts:
- Tenants & Multi-tenancy - Understanding tenant isolation, data separation, and multi-tenant access - Understanding tenant isolation and multi-tenant user access
- Permissions - Comprehensive explanation of access control and role-based permissions - Comprehensive permission system and RBAC framework
- Approvals - How approval workflows and signature processes function - Approval workflows and signatory requirements
Platform Features:
- Signatory Rules - Approval workflow configuration - Configuring multi-level approval workflows
- Pending Changes - Configuration change management - Approving tenant settings changes
- Change History - Audit trail for configuration - Viewing configuration change audit trail
Security & Authentication:
- Authentication Methods - Detailed setup and usage of SSO, LuxTrust, and mobile app authentication - SSO, LuxTrust, and Mobile App configuration
- Digital Signatures - Transaction signing methods and legal validity - Transaction signing and signature requirements
- Compliance & Audit - Security features, audit trails, and regulatory compliance - Audit trails and compliance features
Support
For assistance with user and group management, permission configuration, or SCIM provisioning setup, contact [email protected]. Our support team can help with:
- SCIM integration configuration for Azure AD or Okta
- Permission troubleshooting and access issues
- User provisioning automation setup
- Best practices for group structure and permission design
Updated about 2 months ago